Pages

Sunday, October 29, 2017

TEASING ST PETER

I've run out of time to do a proper blog post this weekend, but I need to post something.  Two weeks since I got back from my trip to BiLT Europe.  The second part of my session there dealt with the inherent scaling capability of the Planting category in Revit, and I used various classical elements for most of my examples, in particular my ongoing work to produce a classical columns collection capable of tackling just about any heritage BIM exploration I might want to take on.

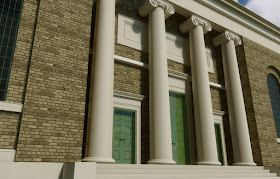
Last weekend I did a bit more work on that collection and then decided to test the results on a real example.  I chose one of Soane's London churches.  St Peter's Walworth

https://projectsoane.wordpress.com/list-of-projects/late-works/churches/


Two weekends have been enough to produce a reasonably advanced model, and more importantly for me, to learn a good deal about Soane's approach to designing churches.  All three of his London churches were designed late in his career, and are essentially boxes with a tower over the front door.


Inside it gets a bit more interesting.  There's a nave and aisles, with sturdy Doric columns supporting the aisle galleries.  Stairs in the corners on either side of the entrance lobby provide access to these upper galleries.  He uses arches windows in arched recesses for this church, which is basically yellow brick with stone trim.


I guess the substantial stone bands at base and eaves act as ring beams from a structural viewpoint, bonding the smaller masonry units together and spreading loads.  It's an idea that has been supplanted by structural frames of steel or concrete in modern times but must have been fundamental to Soane's idea of stability in a medium to large building.


The guys at Enscape very kindly extended my license so I can carry on using it for Project Soane work.  In fact they sorted that out over breakfast at the hotel in Denmark so that I could use it during my session ( it expired the night before which I had not anticipated).  That was pretty impressive and much thanks due to Moritz Luck and Phil Read for allowing me to interrupt their cornflakes to organise that :)


The interior shot illustrates how easy it is to crank up the exposure a bit, add a hint of linework to increase the definition of the ceiling recesses and add some fog so that the light streaming through the windows over the altar looks more dramatic.  It will look even better when I get around to placing some pews and altar furniture of course, and stained glass would be very nice if I can figure that one out.

But beyond generating impressive images, I want to delve a bit deeper into the construction details, how the roof works, etc; and to analyse the rhythms of the side elevation which is quite subtle and relates to the spatial planning in ways which I am still getting to grips with.


Here's a rather unfinished ceiling plan.  The red Xs indicated where the stairs should be (not yet modelled) and the arrows at the back are conjectured functional routes for the resident priest to do his stuff.  I think he has rooms on two storeys in these back corners either side of the altar, but I haven't been inside the church.  I'm basing the interior on some rather low-res photos found on the internet.

That's it for now.  Just a teaser from an adventure in classical column use.  Four different columns/pilasters used here covering Doric, Ionic and Corinthian orders.  The collection is holding up quite well, but not showing up in plan views as well as I would like as yet.

Sunday, October 1, 2017

PLANTING SEEDS IN DENMARK

I'm in Denmark, attending the BiLT conference.  (Revit, BIM, other related stuff)  I am leading one session, called "Planting Seeds".  It's about the Planting category in Revit and the seeds part implies that I am presenting exploratory work that will continue to grow and hopefully stimulate others to build on my ideas.  In the course of my preparations, I opened up some of my early Revit work.  I showed some of the blog-related stuff a couple of weeks ago.  This one is focused on my day job at GAJ Architects, Dubai.


The first version of Revit I ever had was 7.0 so I spend quite some time using the Accurender version of raytracing before Mental Ray was introduced with Revit 2009.  (We also got the swept blend, colour fills in Sections, sloping pads, shape editing floors ... heady days) Accurender had very interesting Planting objects.  They looked a bit wierd in shaded views, but they rendered as genuine 3d objects. If you look carfully at the palm trees in the image above you will see this.  We are looking up into the canopy of the nearby ones, but at a distance you get a side view.


They also had some interesting controls, like "Trim Height" which allowed you to have a tall canopy on a short trunk, or vice-versa.  My next image shows an early example of mixing rendered and shaded images using layers in Photoshop, blending and filtering the image to simulate more of a hand-drawn look.  This can be especially effective to convey the softness of landscape elements.  But of course the "partner in charge" wasn't always convinced that Revit could "do" client-friendly images, so at times we just printed out Revit views and had our pencil and paper guys trace over them. Don't knock it.  Apart from producing very effective images, some useful design ideas can emerge along the way.


For a while I experimented with "Impression" which was free software for processing CAD files.  You could take a hidden line camera view, export it to CAD and use impression to turn the lines into a pencil effect.  This was hard work compared to say Sketchup which gave you a similar effect live, at the click of a button.  But I gave it a go and lived in hope.


The introduction of Mental Ray was quite exciting.  This is one of my very early attempts to exploit its potential.  The way it represents building elements if much more convincing than Accurender.  The shadows are more subtle and realistic with light bouncing around from surface to surface.  But the trees have moved in the reverse direction.  They look flatter, less volumetric, which is probably why I downplayed them so much in these views.


Opening one of the files and viewing with Enscape3d, the planting families that I placed back in 2008 immediately convert into fully volumetric objects.  Some of the custom materials have got screwed up, but that's nothing to do with Enscape, just the fact that my laptop doesn't have the right images on the paths set up under Options/Rendering.  Now this image isn't quite as impressive as some of the others I've been showing, but I'm pretty sure that if I spent half a day gathering together and tweaking the various linked files that were created for this project, I could create a couple of dozen images that represent it far better than the ones we generated in 2008.


Villa Savoye is a project I built around the same time.  It was partly motivated by my own fascination with the history of architecture and building technology, but I also used it as the subject for several training sessions, most notably a brief attempt to teach basic Revit skills to the partners at GAJ.  The image here compares a "realistic" view to the same shot in Enscape (top)  This is informative.  The tree shapes are quite different, although they obviously represent the same species.  The effect in Enscape is much sparser. The trees don't fill out the background as they did in the original.  I think part of the problem may be that some of the families are just not getting picked up in Enscape.  Maybe I have some dodgy RPCs in there.


But generally speaking, the Enscape trees are impressive and fully 3d.  You can view them from above and they look great.  They cast realistic shadows even when the sun is coming from the side. (RPC trees are flat billboards, so shadows from the side are very thin.)  In a realistic view you don't actually get any shadows at all.  Again I am not trying to criticise RPC families.  They are incredibly useful, lightweight and versatile, plus you can do a lot with the free starter pack that comes with a Revit installation.


The final image is not mine, and it's not Revit.  It was produced by the same team at GAJ that did the hand drawn image earlier on, this time using Sketchup and Photoshop.  I was helping a guy working on the same project, but using Revit.  It was early concept design stage, and we really struggled to compete with the Sketchup team.  We were quite proud of the images we came up with, but the partners thought they were awful.  I'm sure many of you have had similar experiences.  Plugins like Enscape3d definitely go a long way towards closing that gap, especially if you have the versatility and imagination to do a bit of mix and match with blended and processed images. 

I will be sharing some of the families from my session at Aarhus in coming weeks, so stay tuned.