In the previous post I made an appeal for anyone who knew how to hide polygon edges to shout up. Many thanks to Fred and Arthur for the very rapid response. Seems I should have done a web search :) Anyway, there is a nice video here LINK and a written description here LINK.
I'm a complete novice when it comes to 3d Max, but I managed to work this one out and created a couple of plumbing families from some Bagno CAD files I had downloaded. I was quite pleased with this and talked to two of our visualisers for a couple of extra tips on the interface before tackling some Fritz Hansen furniture.

I posted about this long back, but at that stage I was stuck with the mesh edges. LINK. So let me take you through the process with a conference chair range called Oxford.
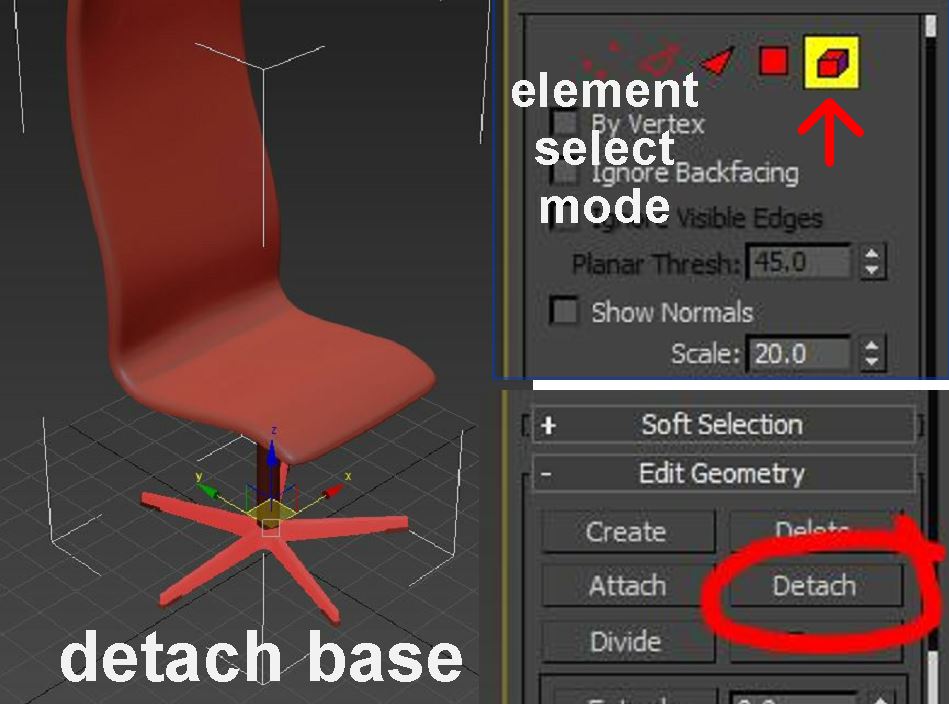
Drag the CAD file in (import) and place it. Set the Visual Style to Clay (my preference, you can see the geometry clearly). Click on the little modify symbol (top right, like a rainbow in a box) It should say "Editable Mesh" in the box below. Then click on the open red triangle in the next box down (Edge) Now you are selecting edges so put a window around everything.

Next scroll down to the bottom of this panel and click on "Invisible" Nothing seems to happen, but if you now change to wireframe the edges will ghost out. Click on empty space to deselect and they disappear altogether, so go back to "clay" so you can see the faces and select objects.

Scroll the panel back up, and click on the box (Element) at the far right under "Selection". Now you can select sub-elements. In this case I have selected the five-legged base. Then click on "Detach" to make this a separate object. You don't have to give it a name because we aren't saving the 3d Max file, just exporting to CAD. Just accept the default naming (Object 001 etc) Continue like that to break up the chair into separate pieces.

This will allow us to place the base and the seat itself on separate layers. Also we can delete the cylinder if we want, and replace it with a native Revit extrusion. That might be better than a facetted mesh.
Finally we will export as a DXF 2004. Don't know why that is important but apparently it is.

Opening this up in AutoCAD, everything is on layer 0. I'm going to make a new layer called "_Fabric" and place the seat on that. Then I put everything else on a layer called "_Metal" Save as DWG. I don't think the version matters this time. (by the way, I checked that everything was set to "bylayer")

Now let's try bringing this into Revit. Start a new family from the Furniture template and import the DWG. In this case it seems the base units are Centimetres. Sounds right for continental Europe. I had to nudge it into position over the origin.

Looking at object styles both line colour and Material are coming from the layer colours I set up in Autocad. I'm going to delete the two surplus layers (0 and ASHADE) then change the Line colours to black. Also I substituted default materials for the automatically generated ones (Render Material 0-0-255 etc) and deleted all these in the materials browser. Don't want to transfer a lot of junk into my projects.

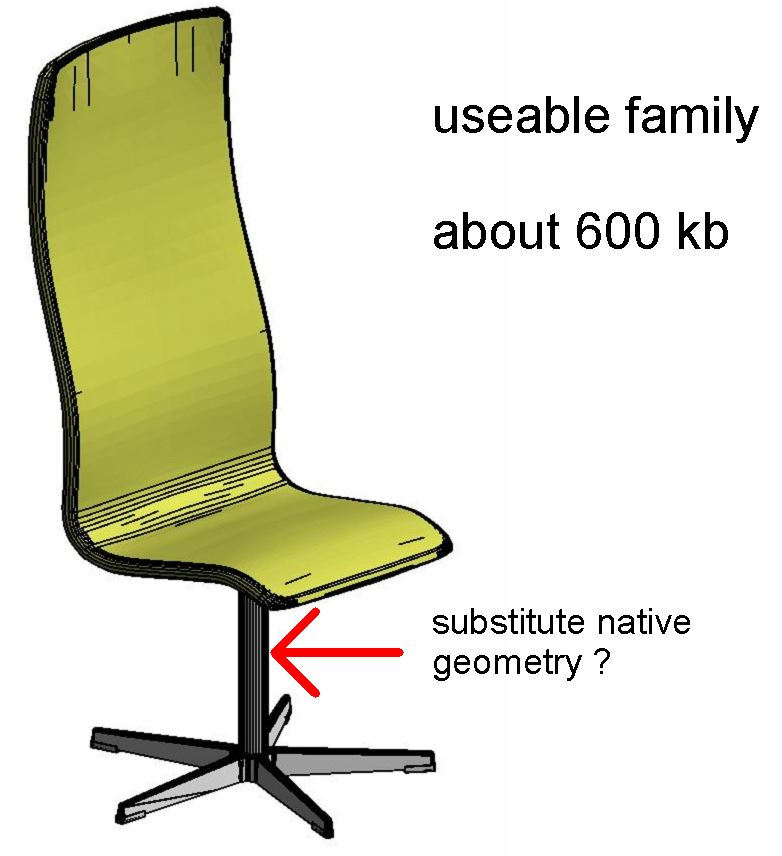
Now this is a fairly useable family as it is, but ultimately I will probably separate out the various elements. The seat comes in different heights, and there are also different styles of base. (one with wheels) So it makes sense to follow a modular approach and mix and match nested components. Also I'm going to substitute native geometry where I can, for a cleaner look ... basically the cylinders I think. I think it will also be valuable to use 2d drafting in plans and elevations. Better for performance, but also a cleaner graphic look for orthographic views.

This particular family is not the most dramatic demonstration of the technique perhaps. You could almost do this in native geometry entirely. You wouldn't get the subtle double curvature and rounding of the edges but it wouldn't be too bad. But earlier on I did the Rin chair which is a complete non-starter with Revit's modelling tools. This turned out very nicely, and looks quite good in plan and elevation even without 2d drafting elements.

Looking at Revit Forum, one comment caught my attention: "... use only if absolutely necessary. Make Native Revit geometry if possible." Now I do agree with this, but words like "necessary" and "possible" are open to interpretation, and I am aware that some members of the "expert elite" are more dogmatic on this issue than I am. I think that an acceptable version of the Oxford chair could probably be made as Native Geometry. It might look a little stiff in rendered views compared to the subtle curvature of the mesh version, especially around the edges, but for most purposes it would be fine. The Rin chair conversely is a clear case where adapting the downloaded mesh version is really a no-brainer. In between there are many shades of grey. Ultimately it's a judgement call.
I will be doing more of this type of work, and probably sharing the families, but for now, I'll finish with a shot of 3 of my new "edge-free" families nestled among older messy-mesh versions from my previous Fritz Hansen post. Furniture Fritz
Needless to say, I'm quite excited by the possibilities.

I'm a complete novice when it comes to 3d Max, but I managed to work this one out and created a couple of plumbing families from some Bagno CAD files I had downloaded. I was quite pleased with this and talked to two of our visualisers for a couple of extra tips on the interface before tackling some Fritz Hansen furniture.

I posted about this long back, but at that stage I was stuck with the mesh edges. LINK. So let me take you through the process with a conference chair range called Oxford.
Drag the CAD file in (import) and place it. Set the Visual Style to Clay (my preference, you can see the geometry clearly). Click on the little modify symbol (top right, like a rainbow in a box) It should say "Editable Mesh" in the box below. Then click on the open red triangle in the next box down (Edge) Now you are selecting edges so put a window around everything.

Next scroll down to the bottom of this panel and click on "Invisible" Nothing seems to happen, but if you now change to wireframe the edges will ghost out. Click on empty space to deselect and they disappear altogether, so go back to "clay" so you can see the faces and select objects.

Scroll the panel back up, and click on the box (Element) at the far right under "Selection". Now you can select sub-elements. In this case I have selected the five-legged base. Then click on "Detach" to make this a separate object. You don't have to give it a name because we aren't saving the 3d Max file, just exporting to CAD. Just accept the default naming (Object 001 etc) Continue like that to break up the chair into separate pieces.
This will allow us to place the base and the seat itself on separate layers. Also we can delete the cylinder if we want, and replace it with a native Revit extrusion. That might be better than a facetted mesh.
Finally we will export as a DXF 2004. Don't know why that is important but apparently it is.

Opening this up in AutoCAD, everything is on layer 0. I'm going to make a new layer called "_Fabric" and place the seat on that. Then I put everything else on a layer called "_Metal" Save as DWG. I don't think the version matters this time. (by the way, I checked that everything was set to "bylayer")

Now let's try bringing this into Revit. Start a new family from the Furniture template and import the DWG. In this case it seems the base units are Centimetres. Sounds right for continental Europe. I had to nudge it into position over the origin.

Looking at object styles both line colour and Material are coming from the layer colours I set up in Autocad. I'm going to delete the two surplus layers (0 and ASHADE) then change the Line colours to black. Also I substituted default materials for the automatically generated ones (Render Material 0-0-255 etc) and deleted all these in the materials browser. Don't want to transfer a lot of junk into my projects.

Now this is a fairly useable family as it is, but ultimately I will probably separate out the various elements. The seat comes in different heights, and there are also different styles of base. (one with wheels) So it makes sense to follow a modular approach and mix and match nested components. Also I'm going to substitute native geometry where I can, for a cleaner look ... basically the cylinders I think. I think it will also be valuable to use 2d drafting in plans and elevations. Better for performance, but also a cleaner graphic look for orthographic views.
This particular family is not the most dramatic demonstration of the technique perhaps. You could almost do this in native geometry entirely. You wouldn't get the subtle double curvature and rounding of the edges but it wouldn't be too bad. But earlier on I did the Rin chair which is a complete non-starter with Revit's modelling tools. This turned out very nicely, and looks quite good in plan and elevation even without 2d drafting elements.
Looking at Revit Forum, one comment caught my attention: "... use only if absolutely necessary. Make Native Revit geometry if possible." Now I do agree with this, but words like "necessary" and "possible" are open to interpretation, and I am aware that some members of the "expert elite" are more dogmatic on this issue than I am. I think that an acceptable version of the Oxford chair could probably be made as Native Geometry. It might look a little stiff in rendered views compared to the subtle curvature of the mesh version, especially around the edges, but for most purposes it would be fine. The Rin chair conversely is a clear case where adapting the downloaded mesh version is really a no-brainer. In between there are many shades of grey. Ultimately it's a judgement call.
I will be doing more of this type of work, and probably sharing the families, but for now, I'll finish with a shot of 3 of my new "edge-free" families nestled among older messy-mesh versions from my previous Fritz Hansen post. Furniture Fritz
Needless to say, I'm quite excited by the possibilities.

Very nice post, Andy. The images make it much more readable than the quick list I had put together.
ReplyDeleteThanks Arthur, couldn't have done it without you :) Let's hope more and more people use this to create shareable content.
ReplyDeleteThanks Andy,
ReplyDeleteI have struggled with this in the past so I look forward to trying it in the future.
Thanks Andy - definitely something I've needed to use with demanding interior designers in our firm!
ReplyDeleteThanks Andy for sharing.
ReplyDeletethank for the wonderful post , lots of information gained , visit us Revit Modeling in uk
ReplyDeleteThis information which you provided is very much useful for us.It was very interesting and useful. Thanks for sharing
ReplyDeletehttps://indusdesignworks.com/3d-rendering-services.php
Online 3d rendering services
Many, many thanks. I've been struggling with those annoying lines that always came with exported objects and now I can use any element modeled on Max, Rhino, or SketchUp in Revit. This is a chain-free technique for visualization and 2D documentation.
ReplyDeleteNice articles and your information valuable and good articles thank for the sharing information mesh chair
ReplyDeleteI learned a lot from this post. Thanks for making it so easy to understand! 8 Seater Dining Table Set
ReplyDeleteMultiwood furniture is highly resistant to environmental changes, making it ideal for areas with fluctuating temperatures or high humidity. Unlike solid wood, it does not expand, contract, or crack due to moisture, making it perfect for both indoor and outdoor use.
ReplyDeleteMultiwood furniture is often designed for quick assembly, with modular components that can be easily put together. This makes it convenient for large-scale office setups, home renovations, and interior projects that require fast furnishing solutions.
ReplyDeleteNice articles and your information valuable and good articles thank for the sharing information mesh chair office
ReplyDelete