I've been struggling with the need for better sanitary ware families for some years now. Out of the box you basically get some stuff made 7 or 8 years ago that illustrates how families could be made. I wouldn't want to use them in a set of construction drawings. The graphics in plan or elevation just aren't crisp enough, and there's no way I would render them for a client presentation.

In fairness to Autodesk, they are supplying the toolkit, not the building materials. These families should be coming from the companies that make the sanitary ware. This is slowly starting to happen, but 9 times out of 10 you will end up making it yourself. I use masking regions and symbolic lines for orthographic views, (often DWG files downloaded from manufacturer sites). Solid geometry is set to be only visible in 3d views.

Making plausible 3d geometry is not easy, but it can be done. About 3 years ago I made a passable version of the Ideal Standard "Tiffany" range using old fashioned revit extrusions & sweeps. With a bit of imagination this can be made to work for many fittings.

Another approach is to model in a different application and import the results into a Revit family as a 3d DWG or SAT file . A bit of careful naming with your CAD layers under Object Styles/Imports in Families can give you control over the materials from within the project. I flirted briefly with 123D (see previous post) but haven't found time yet to pursue this further.

Some manufacturers supply 3d CAD files that you can import into families. I spent a week or so last year making a whole bunch of families using downloads from Duravit and Hansgrohe . One day I will write this up as a separate post.

More recently I've been using the conceptual massing tools to generate forms. The trick is to draw a closed loop in a mass family and use this as a profile to generate forms.

Load your profile into another mass family or adaptive component and paste multiple copies onto a series of levels.

Now you can flex the profiles using parameters you built in to them. (width, length, radius etc) Select them all and "create form". Plumbing fixtures tend to be re-entrant forms. You can't make these directly, but I learnt a little trick during my pumpkin experiments.

After the form is made, you can move the top profile down. Just go into an elevation view and move the level it's hosted on.

This is a counter-top basin. I made it previously using blends and rounding off the rim with a void sweep but it lacked the subtle curves of this version.

This first exploration gave me the insights I needed to plan a semi-recessed basin. The profile makes use of simple formulae to keep the depth parameters proportional to the width.

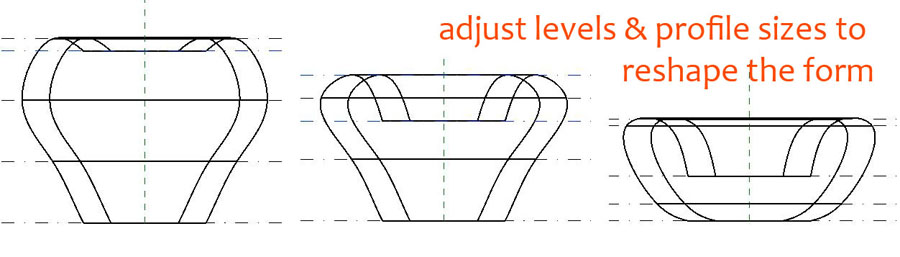
This time I controlled the heights of the profiles by giving each of them a different offset parameter (H1, H2 etc) Once again the trick is to arrange your profiles in a simple sequence and adjust them later to form a bowl. Tab-select each profile to adjust its size and position. With a bit of careful tweaking I achieved something close to what I wanted.

If you dissolve the form and remake it you get something totally different. This illustrates the basic principle of making re-entrant forms with Revit conceptual massing profiles. start with a convex form, then adjust the profile heights AFTER using the create form button

To make the top of the basin flatter, I adjusted the profile slightly, and added another 2 instances. Had to reset the heights before hitting "Create Form" then more careful tweaking in a side elevation view to sculpt the form.

A simple void extrusion cuts away the back. Then it's ready to receive a chrome tap and waste from my accessories library. It renders very nicely, but now for the bad news. In Revit 2012, adaptive components can be lots of things, but not plumbing fixtures. Plumbing fixtures (eg the tap) can be nested inside them. but they cannot be nested inside normal families. Also you can't use symbolic lines or masking regions in an adaptive component.

I'm not sure what's preventing this. Maybe there is a serious software problem, or perhaps Autodesk are just being cautious, waiting for processing power to catch up before allowing conceptual massing tools to spread through into all the family types. I could export my form to CAD and re-import it into a plumbing family, but that's rather a sad work-around.

Wouldn't it be nice if I didn't have to fiddle with this stuff in my spare time and we could just download high quality content from the manufacturers. I'm talking about families that look good in high-quality interior design visuals, and in construction drawings at 1:100 or 1:20.

In fairness to Autodesk, they are supplying the toolkit, not the building materials. These families should be coming from the companies that make the sanitary ware. This is slowly starting to happen, but 9 times out of 10 you will end up making it yourself. I use masking regions and symbolic lines for orthographic views, (often DWG files downloaded from manufacturer sites). Solid geometry is set to be only visible in 3d views.

Making plausible 3d geometry is not easy, but it can be done. About 3 years ago I made a passable version of the Ideal Standard "Tiffany" range using old fashioned revit extrusions & sweeps. With a bit of imagination this can be made to work for many fittings.

Another approach is to model in a different application and import the results into a Revit family as a 3d DWG or SAT file . A bit of careful naming with your CAD layers under Object Styles/Imports in Families can give you control over the materials from within the project. I flirted briefly with 123D (see previous post) but haven't found time yet to pursue this further.

Some manufacturers supply 3d CAD files that you can import into families. I spent a week or so last year making a whole bunch of families using downloads from Duravit and Hansgrohe . One day I will write this up as a separate post.


Load your profile into another mass family or adaptive component and paste multiple copies onto a series of levels.

Now you can flex the profiles using parameters you built in to them. (width, length, radius etc) Select them all and "create form". Plumbing fixtures tend to be re-entrant forms. You can't make these directly, but I learnt a little trick during my pumpkin experiments.

After the form is made, you can move the top profile down. Just go into an elevation view and move the level it's hosted on.
This is a counter-top basin. I made it previously using blends and rounding off the rim with a void sweep but it lacked the subtle curves of this version.

This first exploration gave me the insights I needed to plan a semi-recessed basin. The profile makes use of simple formulae to keep the depth parameters proportional to the width.

This time I controlled the heights of the profiles by giving each of them a different offset parameter (H1, H2 etc) Once again the trick is to arrange your profiles in a simple sequence and adjust them later to form a bowl. Tab-select each profile to adjust its size and position. With a bit of careful tweaking I achieved something close to what I wanted.

If you dissolve the form and remake it you get something totally different. This illustrates the basic principle of making re-entrant forms with Revit conceptual massing profiles. start with a convex form, then adjust the profile heights AFTER using the create form button

To make the top of the basin flatter, I adjusted the profile slightly, and added another 2 instances. Had to reset the heights before hitting "Create Form" then more careful tweaking in a side elevation view to sculpt the form.

A simple void extrusion cuts away the back. Then it's ready to receive a chrome tap and waste from my accessories library. It renders very nicely, but now for the bad news. In Revit 2012, adaptive components can be lots of things, but not plumbing fixtures. Plumbing fixtures (eg the tap) can be nested inside them. but they cannot be nested inside normal families. Also you can't use symbolic lines or masking regions in an adaptive component.

I'm not sure what's preventing this. Maybe there is a serious software problem, or perhaps Autodesk are just being cautious, waiting for processing power to catch up before allowing conceptual massing tools to spread through into all the family types. I could export my form to CAD and re-import it into a plumbing family, but that's rather a sad work-around.

Wouldn't it be nice if I didn't have to fiddle with this stuff in my spare time and we could just download high quality content from the manufacturers. I'm talking about families that look good in high-quality interior design visuals, and in construction drawings at 1:100 or 1:20.
of curiosity, are these families that may be shared some day by yourself? :)
ReplyDeleteYes indeed. I posted some furniture a couple of months back, and shall endeavour to put some more goodies on the supermarket shelves very soon. Stay tuned.
ReplyDeleteandy, very nice stuff, nice to know you'll be sharing!
ReplyDeleteandy, wondering if there's any "news" on the sharing of these families!
ReplyDelete