Thursday, November 29, 2012

CUBE RIG BLUES

I had a great time 3 weeks ago on Vasari Talk with Zach Kron & Lilli Smith from Autodesk.  You can watch the session on youtube if you missed it.  Follow the link here : Spring Onion.  Also, if you want to download the "square onion" file that I was playing with towards the end of the session you can find it here :  Repeater File.

During the discussions, Zach noted that most of my vegetables were based on the idea of a scalable rectangle, & asked if I had tried using a scalable cube.  My answer was basically that I like to keep things simple, hence the focus on a 2d rig.  But since then I have begun to explore the idea of a cube, just to see if there is any potential there which can be exploited without getting too deep into the realms of complexity.


So my first trial scales up by typing in a length value & has factors for varying the proportions of the cuboid (relation of height & width to length)  The first think that came to mind for this was to host a 3 point adaptive component into it as a repeater.  So I made up a simple prototype roof truss.


This worked out fine.  You can adjust the cube parameters so that you type in a length and width, then use a height factor to control the roof pitch.  Probably with a bit of trigonometry revision I could get it to respond to an angle parameter.


This was promising enough to encourage me to flesh out the truss some more.  Looks OK.  Very easy to parametise the repeater number so you can specify the number of trusses.  Again this could be reverse engineered to let you type in a spacing and have Revit work out the number of trusses.


Also it's very easy to control the position of the ridge line so as to create assymetrical trusses.  So I think this is definitely one valid use for the cube rig. 


You can work up different types of 3 point adaptive also to vary the truss style (King Post, Queen Post, Fink etc)  Easy enough to extend the rafters to create an eaves overhang also.  Would be interesting to push this a bit further and create the framing for more complex roofs using this approach.


But this time around I left it there and went on to explore using the cube rig for other types of scalable shape.  This series of explorations was less successful (in my view)  I started off by placing a couple of 3 point adaptive components, just triangles made with model lines.  Select these and create form.  Play around with the size and proportions of different instances


Next I tried dividing up the cube into slices, much the same way as I place horizontals in my rectangular rigs.  Then I used these to host splines, again much like the spring onion, or the sweet potato, etc.  These splines can then be used to define a surface. 


You can adjust the surface manually by nudging points around, then when you get something you like, loat it into a project and scale it up and down.  Also vary the proportions of the bounding box.  No idea what this might be though.


To create a solid form, I made the 3 splines into repeaters and hosted a 3 point adaptive component.  Select all these and create form.  I played around for a while with these, hoping that something interesting would shape up, but mostly I just ended up with wierd shapes that can be scaled up and pushed & pulled into different proportions.


Probably some ideas for exploiting this idea will come to me later on, but at the moment I am not greatly impressed so I decided to change the rules slightly.  The next set of explorations was more interesting & I will share them in a separate post.  For the moment here's a little teaser,


Monday, November 19, 2012

PINK PANTHEON

Two posts back I imagined 4 different scenarios in which we might decide to specify a Corinthian column, how that might affect the procurement process & therefore the way we would document that element

Scenario 1 envisaged a lightweight "placeholder" family, backed up by a specification that calls for a "design & manufacture" specialist.  So I decided to take a crack at making this family & went on to try it out in context.  The context then took on a life of its own & became the Pantheon (Rome not Paris)


The capital is a blend plus an extrusion. The important thing for scalability is to have one parameter that controls the size of all the others.  I chose the Radius at the base of the capital, because this could then be linked to the Radius at the top of the shaft.


Simple formulae were used to link all the other parameters back to this Radius.  In elevations views, the solid elements are switched off and replaced by a masking region plus symbolic lines.  I tried to keep the number of lines down to a minimum that could fool the brain into saying "Corinthian Capital".


Testing out the column in context took me to the Pantheon.  I'm feeling fairly good about this. 


Then to try out the scalability, there are some internal niches with much smaller columns.  Had some strange behaviour where the niche family flipped to the wrong side of the wall. 


This is where I started to get carried away.  I remembered Zach's coffer dome from way back, so I had to have a go at this.  Actually the top part of the dome is smooth, (which was easy to do) and the coffers are all eccentric to compensate for perspective (left that for another day)


I couldn't resist going for an internal render, which meant working up just enough internal detail to catch the atmosphere.  A couple of stock RPC people provide a sense of scale.

I haven't shown an internal section view yet, because this requires manual scaling of the 2d lines.  Can't see any way around that at present.  If you export them to CAD and reimport, there is a scale factor but I don't think it's possible to parameterise this. 


The other shortcoming is that 2d only works when the family is square on to the view, and obviously not all the internal columns are going to be at right angles because they follow the curve of the circle.  You can see the effect in the section.  Only one column is showing the symbolic capital and the manual scaling is slightly out of date ... doesn't quite match the 3D.


The external elevations are coming on nicely, but once again the base moulding has to be scaled manually for different column sizes at present.  I'm guessing that Paul Aubin has progressed much further than me on this. 


I experimented with the idea of enhancing the capitals in image processing software, but this is a bit tedious really, only had the patience for two.  This was all done before I had developed the "new leaf"  capital I described in my last post.  So I will get around to incorporating an improved version of that into the Pantheon one of these days. 


To close I have a double image.  On the left is a reminder of the subtle delicacy of the original, which has survived many centuries of abuse.  On the right is my clumsy attempt to make a scalable capital using old-school Revit extrusions.  Pretty awful.  I thought it might be possible to make something that looked almost as good as the 2d symbolic and so avoid the manual scaling.  Wishful thinking.


Wednesday, November 14, 2012

A NEW LEAF

I've got quite a nice thing going with Paul Aubin here, motivating each other to think more deeply about what we are doing & to extend our modelling horizons.  On the face of it, the topic is classical orders, & more specifically Corinthian Capitals, but as Paul has noted it takes us into various topics of very general application such as appropriate "Level of Detail"  (also called Level of Development or LOD)


In my previous post, I imagined a number of different scenarios that might suggest rather different approaches to these issues, depending on what you wanted to achieve & the method of procurement (eg "off the shelve components" versus "project specific design & install by approved specialist")  Paul has taken a slightly different approach. basically setting himself a very demanding modelling challenge and seeing how close he can get.  It's a work in progress but the results to date are impressive to say the least


The work I want to show in this post was inspired by Paul's efforts and was mostly done just before the Pumpkin Competition.  It was in fact my first attempt at a "scalable rectangular rig" and helped to give me the confidence to tackle a scalable vegetable collection.


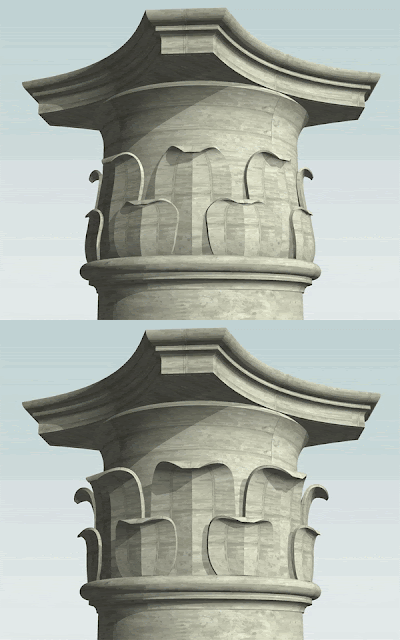
So I had recently watched Paul's video clip and having recovered from the initial shock, suddenly got the idea that a 2 dimensional rig could be used to create a leaf.  I made it adaptive so that it could be repeated around a cylindrical form.


I decided to keep the profile simple also, for the initial "proof of concept" stage at least.  So it's a triangle with flattened ends, which was easy to set up parametrically.


I made 3 different types, and hosted 4 instances on to the spline.  The "mid" type is used twice.  The sizes of these 3 profiles are linked to parameters in the host file so that you end up which can be made broader or narrower after you load it.  So there are triangular profiles, nested into a leaf, which is nested into a corinthian capital, and from the capital file you can adjust the size of those triangles to control the proportions of the leaves.


Within the capital file, the adaptive leaf components are hung onto a cylinder which has height and radius parameters.  This gives me a circular array of 8 leaves with the controls I need.


Double up the ring and you are well on your way to a Corinthian Capital.

Before I set about the scrolls at the corners, I needed an abacus to push them up against.  I conceptualised this as an extrusion with a sweep running around the edge and set about making a scalable rig for the sketch defining the extrusion.  This worked out fine as shown above.


If you look over my previous post you will note that the proportions of corinthian capitals can vary quite a bit.  This is quite easy to do with the controls I built into the leaf family.  At this stage I compared my capital with the photos and decided that I had the S curve of the leaf wrong.  Not that there is an absolute "right" & "wrong" here, but I wanted to capture the  way that most of the leave in my photos went up straighter and curled out more at the top.


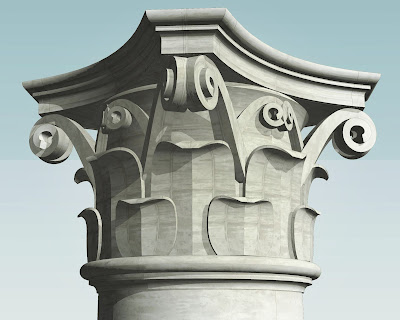
This just meant opening up the leaf family and adjusting the spline.  Enough of that.  Time to tackle the spiral scrolls.  Once more I turned to a rectangular rig.  This time it's a square with a cross, and then a union jack in the top right corner.


Draw a spline and host a few rectangular profiles along it.  Create form & play with the sizes & proportions of these rectangles.  Watch out for self-intersecting geometry.  The first attempt is going to be too open and rather uneven, but you can zoom in there and nudge each point around to close up the gaps.


There may well be better ways to make these scrolls, but this one is quite interesting and I managed to tighten up the gaps quite nicely.  Then it was just a matter of linking all the profile sizes back to parameters and controlling these by formulas containing "X"  (where X & Y are the sides of the whole rig)  Now the whole thing will scale up and down by typing in a new X value.  Good enough


So I plugged in 16 copies of the scroll (8 big & 8 small) and decided to call it a day.  Each of the elements that make up the capital is separately scalable, but as yet I can't scale the whole thing up and down with a single click.  Also it is still a somewhat stylised and simplified version.  Currently it is standing at almost 6mb.  Not disastrous, but you things might slow down a bit if you had a couple of hundred of them (think Colloseum)


This was all done almost 6 weeks ago, just before I launched myself into the vegetable kingdom.  You can expect an update shortly, and keep an eye on Paul's blog also to see how his version develops.

http://paulaubin.com/
 

Thursday, November 8, 2012

DESERT CLASSIC

This post has been on hold for a month while I played with vegetables.  Due warning.  I'm about to get pedantic again.  It was inspired by Paul Aubin's recent post displaying his considerable modelling skills in the form of a parametric corinthian capital.


Let me start by saying "great work Paul" and "I am truly gobsmacked".  But ... what a can of worms it opens up.  So I am going to head off at a tangent.  Here are a few snapshots from my album, mostly London, but various other towns & cities on both sides of the Atlantic feature.

The most obvious point to make is that there is a great deal of scope for variation at every level : scale, proportion, complexity, mood.  The buildings in question range from terraced housing to law courts, neo-classical to English free-style, stone to terracota. 


And by the way I didn't select for variation here.  I just dropped them in as they came, ordered by file name.    How can we possibly standardise and parameterise all that variety ?  And even if we could, where would that get us ? 

The spirit of the corinthian seems to live in it's infinite ability to be constantly re-invented.  How do you factor that into an equation ?  I'm not trying to be negative here.  I love what Paul has set out to do.  It's just that it opens up so many questions which I think go way beyond the issue of how to model the classical orders.  How does the promise of BIM progress beyond the banality of ROI into the kind of freedom of expression that these capitals express ? 


Generally speaking these examples range from 100 to 200 years old.  Some pre-date blueprint technology, all came before Diazo printing with its ammonia stench.  How could such a diverse human cast (world famous architect to jobbing builder) create such a rich set of variations so effortlessly ?  And how could a Revit family that resizes itself on cue to a few typed numbers hope to join such a tradition ?


It's not a put-down.  I'm asking serious questions.  David Light commented recently that BIM is just beginning.  Absolutely.  And as a community we have a lot of open-ended challenges to address.  We are very good at telling the unbelievers to open up their minds to the future.  Personally I sometimes feel quite blinkered and hemmed in myself.  What happened to the freedom I used to feel with pencil & paper ?  Why do I spend my day tussling with reference planes & shared parameters ?


The "cartoons" are from a project I did 20 years ago when I went back to university at the age of 40.  I was tussling with the question of meaning & architecture.  How does BIM help us to make our work mean something, to express something of lasting value in a world of instant gratification ?  It's an open question.


Taking a closer look at capital(ism).  Here are 2 from Bloomsbury.  One a splendid example of faience ... cutting edge technology in it's day.  Fired clay from standard moulds ... see how they slot together. Stylisation & modularity.  The other is Nicholas Hawksmoor, a church interior.  Not sure of the technology here, fibrous plaster perhaps ?  See how the acanthus leaves creep up so flat against the cylindrical shaft only to curl free at the last minute. 


Consider the next pair.  One from New York, the other ... Sheffield Town Hall a favourite building from my teenage years.  Both carved from real stone, and both hinting at a mediavelised classicism.  One slender and sinuous, the other squat & static.  Look carefully at the 2 capitals from Sheffield, identical at first glance but betraying their hand-carved individuality when you look a little closer.

Imagine 4 scenarios.  Firstly a genuine attempt at classicism, a bank perhaps.  You need 3 different sizes of corinthian column.  How are you going to tackle this in BIM ?  Secondly an act of historic restoration.  You need to replicate existing capitals as accurately as possible.  Thirdly a slightly tongue-in-cheek reference, a re-interpretation of the corinthian that takes considerable liberties.  Number 4 is speculative housing with corinthian porticos, built to a budget.


In scenario one, I would be looking to  use a simplified capital in my family: probably a simple blend with some added drafting for elevation views.  The scaling might not be fully parametric.  I might do the drafting as a cad import, open it up in family editor and resize manually.  A bit of a hack perhaps, but could be the most effective solution in this case.

This would handle design development and general layout drawings.  What about the typical details ?  I think we need a specialist.  This is a prestige job and I want a cast-stone supplier who has serious craftsmen on his team who can make mock-ups for us that bring the corinthian to life.  So at tender stage I am going to embed into my BIM package a couple of reference photographs, a hand drawn sketch and a design/build spec.  This will give bidders a basis for pricing, knowing that they will have to submit mock-ups for approval, and to allow for an iterative design process using an approved specialist. 


In scenario two, I could take rubber moulds.  That wouldn't help with my Revit model.  Maybe these days we would do a laser scanned point cloud.  That could take us to 3d printing, some touch-ups by skilled artisans and mould casting.  It could also generate 3d files to embed in my Revit tamily.  I could have 3 levels of detail, one of which would be the blend plus detail lines outlined in scenario one.  The point cloud version would rarely get swapped in, but could generate some really nice renderings for the client's fund-raising efforts.

Scenario three got me going a bit.  You will notice a couple of things about my reference photos that Paul may be aware of, but hasn't yet reflected in his work.  The scrolls at the corners are almost always made from two separate pieces that converge and merge just at the corner, where they often project beyond the moulding above.


Each of these two pieces is normally an asymmetrical double scroll.  That is: the main scroll that meets it's twin on the corner has a secondary scroll branching off its back and heading back towards the middle.  Finally, note the punched hole where two scrolls meet on the corner.


I chose to re-think the corinthian as a piece of architectural metalwork.  Scrolls made from flat bar, and leaves cut and bent from flat sheet.  Not sure how the top moulding is made.  Probably also starts as sheet, heated and passed through rollers.  Would need to be mitred and welded/brazed at the corners, then carefully ground and polished, probably by hand.


I didn't make this parametric.  I was using Revit in the same way many use Sketchup, as a quick way to get a design idea down "on paper.  I didn't use Sketchup because in my view Revit is better, even for playing around with early design ideas.  It just takes a little longer to become fluent, but after that there's no contest.


Scenario 4 is almost certainly a matter of selecting an existing pre-cast concrete / GRC / GRP product.  If I am lucky the supplier can give me am RFA file.  Failing that I revert to the blend plus detail component approach.  They can probably supply a cad elevation.  Maybe I will give the family back to them so the next architect will have an easier time.  No need to draw this up at half size.  Just put the product details in the spec with contact details and maybe a photo.


So thanks to Paul for getting me juiced up.  Hope you don't mind me taking the conversation in a different direction.  And I hope this helps some of you to think harder about the great variety of approaches that are possible when creating families for real-life situations.

More to follow shortly because I went on to apply my scenario 1 approach to the Pantheon in Rome & then had a go at the scalable capital challenge that Paul was exploring.