Monday, March 29, 2021

WHAT ABOUT THE WORKERS?

In 1989 I started to claw my way back into the profession I had abandoned 16 years previously.  I’m not sure that would have happened if I had stayed in the UK. But in the context of Zimbabwe during the first decade of independence, being an architect seemed like it could be a useful contribution to the world. Plus I had a young family to support and my "rebellious student" persona was mellowing.

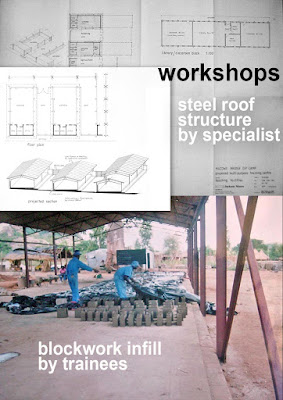
This was probably the high point of my hopes for Zimbabwe, and one Project in particular captures that spirit. It was a training centre for Mozambican refugees in the remote North East of the country.


The workshops were open-sided sheds with enclosed store rooms at one end. Woodwork, metalwork and building skills were offered to refugees and to local villagers. I visited the site to set out the buildings, and  to monitor the early stages of the building work.  Then I got a chance to complete my qualifications as a mature student at a South African university. My last visit was during the break between my two years of study. On my return, I had to switch firms and I lost touch with the project.


The refugee camp was closed long ago. I hope the training centre is still operating, but who knows? Zimbabwe has been through some desperate times in the intervening years.  Eventually I jumped ship and ended up here in Dubai.

I had hoped for a career designing worthy projects in this vein, but life takes its own course and external forces buffet us around. All the same it’s been an interesting journey and I certainly got a thrill last week when I found this project on Google earth ... for the first time.  The quality of the imagery must have improved significantly since last time I looked.


My mission now is to piece together the threads of my experience. The time I spent as a bricklayer in Sheffield in my twenties, the building books I wrote and illustrated for the ministry of education is Zimbabwe. The 3 roomed workers’ houses I designed for Mazowe Bridge. The power of the BIM pencil.

I have been sharing images on LinkedIn. It seems crazy to build walls brick by brick in Revit, but there is a method to my madness.


So much of the BIM narrative is shooting at the moon, worshiping technology blindly, promising miracles.  I want to do something very simple. Tell the story of a 3 roomed house being built, step by step in rural Africa.

Laying out brick courses in Revit brings back the thrill of solving bonding problems in my twenties. I am rediscovering the rookie mistakes that come when you build corners without dry bonding your way all around the building first. Straight joints or nasty broken bond. 


Looking back at the blurred digital shots of the hand-drawn construction set that I drew out, standing up at my parallel-motion board all those years ago seems like stepping into a time machine.  But it some ways it was a healthier activity than sitting in front of a pair of flat screens, moving a plastic pebble around jerkily with occasional jabs at the keyboard.  


Friday, March 26, 2021

BRICK BY BRICK


I’m building on an idea from 2006 near the beginning of my Revit journey.  I managed to open the original file, but decided to start again from scratch … hardly surprising really. 

Way back in the mid-1980s when I was writing textbooks for the ministry of Education in Zimbabwe, we use the construction of a simple rural house as a story line to connect the various exercises, theory lessons, skill training etc. that comprised the syllabus.

The illustrations were all hand drawn, and we never got past halfway.  20 years later I decided to use Revit to tell this story.  Another 15 years on I’m trying to follow through on that.

My first challenge is to generate a set of modular families to represent brickwork in the process of being built: erecting corners, stretching a line, running in, erecting more corners, placing frames, more running in, etc.


The building I am proposing to construct, “brick by brick” is based on a design that I came up with around 1990 for a 3 roomed worker’s house at a remote training centre in North East Zimbabwe.  The location was a camp for Mozambican refugees, and everything was done in a very simple way with hand tools. 

The actual house was built with cement blocks, but I am going to use UK-metric size bricks.  Those are the sizes I worked with when I was a bricklayer in the 1970s.  Almost immediately some interesting challenges arose with a Tee junction sitting 1 ¾ bricks away from a stopped end.  These projections will be used to carry roof beams, providing a degree of overhang to shade the windows.  We didn’t want to use factory-built trusses because of transport costs.


I had previously modelled this same house in a conventional Revit way, using the wall tool.  So I brought in a pdf generated from this file as a guide.  I’m using a “standard brick” family with the various cut sizes as “Types” (Half Bat, Queen Closer, ¾ etc.)  This is a “shared-nested” element within linear-array families that represent a header course, or a stretcher course.  These then nest into component families that represent four courses of “running in” with a parameter to control the length required.  The various corners and junctions are generally assembled brick by brick, but with visibility parameters to toggle between different conditions (stopped end, toothing, raking back)


To be honest it’s still a bit of a mess at the moment.  With every new challenge I have to go back and rectify shortcomings in my modular elements, add new parameters, re-think the approach perhaps.  But we will get there, and I will have a system at the end which can be quite easily adapted to other “way we build” story-telling episodes.

I’m going to include a shot of the original file from 2006.  I actually had a level for every single brick course.  Looks pretty crazy now that you can see levels in 3d.  There were no nested families in this version.  Just some arrays, created directly in the project.  As you can see, it was a different house plan.


I’m almost ready to start adding some door frames now, and to show how they are plumbed up and propped in place while brickwork proceeds.  They will be pressed-metal frames which are pretty much universal in Zimbabwe.  The door panels will be hung much later of course. 

Then I need to go back and show the timber profiles used for marking out the foundation trenches and the method for plumbing down from the lines to mark the position of the brick corners below ground level.  I did some work on this before, in 2013.  Note the early use of “Realistic” view in this image.


Below is a photo of one of the houses, taken during one of my site visits.  The basic layout is the same, but I am adjusting some of the details to suit my pedagogical goals.  The unfinished building on the right is a communal kitchen.  I’m not sure if these were actually used, or maybe people reverted to the traditional open fire approach.  There was no electricity in the area, but I think there was a plan to electrify the main training centre. Not the workers’ houses though.  They would have had a basic ring of piped water based on boreholes and storage tanks, and some flush toilets feeding into septic tanks.  Maybe there was a plan to install a small sewage pond system.  I don’t really remember.


The final image is a sheet that I set up for a talk I gave some years ago to building professionals in Dubai.  Those were the days when most consultants didn’t know what BIM was.  I used that model to demonstrate the concept of generating all the information from a single source and having all the views and schedules update in real time when you made a simple change like deleting a door.

So this gives an idea of the house I am setting out to construct, “brick by brick” with the intention of using Phasing to show the construction sequence in a step-by-step fashion.

More to come


Friday, March 19, 2021

MORE GREY STORIES

 August 2013 and a series of fairly diverse posts.  The first one deals with embedded detail items and the “show when cut” checkbox.  This feature is disabled for most categories but can be accessed by changing the category to “window” and back again.  I should do another post about this kind of work. I wish there was an easier way to draw a detail “in-place” and then transfer this work into the family environment so it appears in every instance of a placed family.

The complex families shown in this post illustrate the kind of situation I’m talking about.

https://grevity.blogspot.com/2013/08/window-hacking.html


Switching scales from micro to macro in the next post.  Experiments in master-planning/ urban design/ density studies.  Now Revit is probably the wrong tool for this kind of exercise.  On the other hand it sucks to keep switching back and forth between applications and file formats.  Why can’t we move seamlessly between scales from a cupboard detail to a city neighbourhood while maintaining bidirectional associations?

Wouldn’t that be fun?

https://grevity.blogspot.com/2013/08/urban-generics.html


The next one may well be the longest post I ever did.  Can’t believe it!  Impressive though.

It starts with a manifesto for “The Way We Build” which I describe as “my spare time research project” then dives into a description of my decision to start afresh on Corb’s chapel which I had attempted a couple of years previously.  To call this exercise a “journey of discovery” would be a vast understatement.  I learnt things about the construction of this fascinating building that I never suspected, and … what an opportunity to develop new Revit techniques.


https://grevity.blogspot.com/2013/09/the-way-we-build-ronchamp.html


And now for something completely different … once again.  Tackling the forms behind the Gherkin using a different approach from my previous studies, setting up a formula driven rig and generating a matrix of shapes with incremental values.  I’m sure that most people would be looking to Dynamo for this kind of exploration today. 

More than one way to skin a gherkin I guess.


https://grevity.blogspot.com/2013/09/power-cones.html


It’s 17 years now since I came to Dubai and joined GAJ.  So many colleagues have come and gone over that time period. Looking at this photo of the interior design team in 2013 I struggle to find faces that are still with us.  Christine in the middle I think.

I had high hopes of helping that team transition to BIM, but taking the horse to the water is one thing


https://grevity.blogspot.com/2013/09/interior-awards.html


Here’s another long-standing pain-point for Revit.  Groups !!!

Talk about a love-hate relationship.  I have toyed with the links-to-groups and back workflow from time to time, and it’s never really proved worth the effort as a regular process.  Typical room layouts are the focus of attention here.  My attempts to “fake” wall joining when using links.  The intention would be to convert these to groups at the last minute when the design revisions have subsided.  Thus allowing for doors to have instance properties and to be associated with levels, but avoiding the pain of “inconsistent groups” that plagues us when updating layouts multiple times as the design team do their thing.

I remember suggesting to someone at Autodesk at least 12 years ago that it would be useful to have a version of system families like walls that could exist within the Family Editor environment.  I’ve no idea how difficult that would be as a programming challenge, but it still seems like a useful feature to me. 

Visibility controls and room width parameters for variations on the standard room type?  If only.


https://grevity.blogspot.com/2013/09/safety-in-groups.html