Via Project Soane I have come into contact with a young gentleman called Karam Baki who began using Revit as a teenager. He is an architecture student, based in Jordan, and you can get a feel for the breadth and energy of his enthusiasms at this link.
Karam's Gallery

I was particularly impressed with his model of Gerrit Reitveld's Schroder House, a building that has fascinated me for about 50 years now. I did start to model it on 2011, but didn't get very far.

Karam appears to have captured it in the most exquisite detail. I would love to talk about this topic at length, but that will have to be another day. Here is Karam's version

I did write a short piece about the house in 1991 as a History assignment when I was a "mature student" in Joburg, returning to Architecture after a 16 year detour through bricklaying and education. Here is my analysis of the site (hand drawn though I had started to use AutoCAD by then). Mrs Schroder was a young widow, living on the edges of middle class society, both literally and metaphorically. She an Reitveld collaborated to create a very unusual house for a single parent. It turned it's back to the conventional world, looking out over open fields and catching the sun through open corners.

A second, hand-drawn diagram describes the planning: a dense, cellular ground floor, with an open-plan, flexible living space above. As I remember, she rented out the guest room at the back to a lodger for extra income, which is why it is isolated from the rest of the house with its own entrance.

I couldn't resist including the concluding paragraph of my assignment here, which conveys the significance I attached to this project at that time when I was coming in from the wilderness to rejoin the profession, somewhat reluctantly after an extended period of teenage rebellion.

But back to Karam. He has developed a method for switching the hosting style of Revit families which is well worth a look. I first became aware of this via a post by Luke Johnson. It's based on a hack that's been around for many years which allows you to create loadable families that belong to system categories.
What Revit Wants
You start by creating an in-place family. Let's say you choose to make it a ceiling. If you make a group within that family, that group will appear in the Project Browser (under Groups). Now you can save a group out to an external file, and normally this would be a project. This is the basis of the "binding" workflow that allows you to convert links to groups and vice versa.
But, if you save the group while in edit mode, it becomes an RFA file, with the same category as the in-place family from which it originated. Voila! A most ingenious trick with unknown and potentially dangerous consequences.
Karam has created 4 such families and nested them into a generic model template.

Now if you load a ceiling hosted family, it will attach itself to the ceiling object. Delete the other 3 system elements, adjust the origin and save. You now have an un-hosted version of your original hosted family. You can watch Karam's video for further clarification.
Kconvert Video
It's very useful if you want a window to lie in the plane of a sloping wall or roof, for example. The down side is that you have to link through all the parameters (something that Karam does at lightning speed in his video) and of course you get an extra layer of nesting, plus the fact that this is an unsupported hack.
Actually you get two extra layers of nesting if you want it to be face based. The saved "Kconvert" with the wall-hosted object trapped inside will come in perpendicular to whatever face you place it on. Haven't quite figured out the logic of this, but Karam recommends nesting this into a face-based template and adding a void extrusion to cut your hole. More linking of parameters, and it will insert itself into almost anything. Quite neat.

Give it a go and see what you think. It may come in handy if you have a number of families that you really don't want to remake from scratch. Let's say they are wall-hosted windows that you want to convert to roof lights.
Just in passing, my own approach to flexible hosting is to make families as un-hosted elements in the first place, then nest these into whichever template you need. There are two solutions to the parameter linking chore. You can make your nested component a shared family, or you can develop a system of standardized parameters and fixed naming of nested elements.

This is the basis of my modular door families which I presented as a lab in Porto and will also be sharing at BiLT Asia in Singapore.
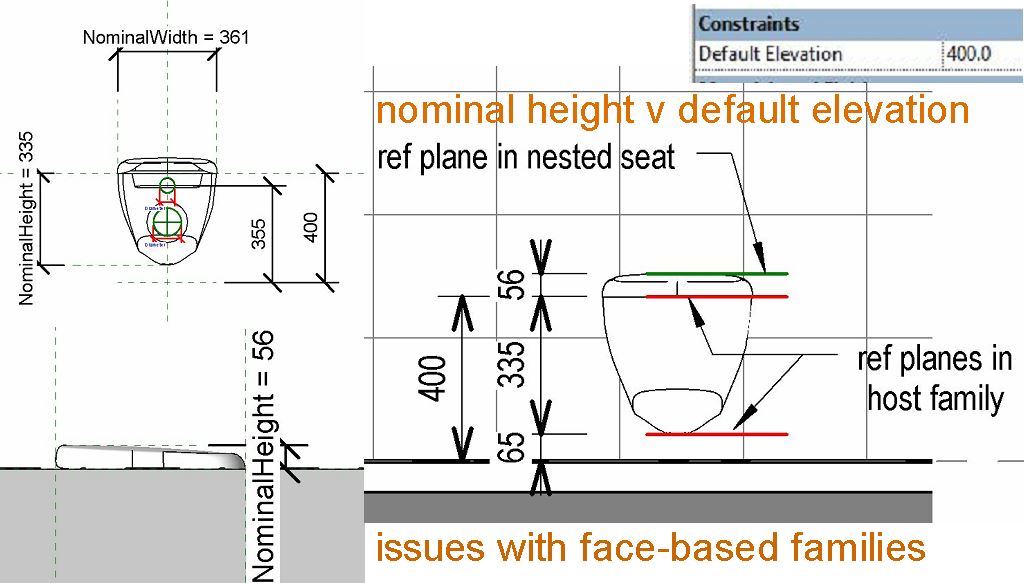
Returning to Karam's method, I wondered if this would help me to unhost the Duravit families I reviewed recently. You might not want these to be wall hosted. Let's say you want to mount them on timber panels for example. Or maybe you want to nest them into a family that incorporates a concealed system, boxed out with a tile facing and a marble shelf.

Unfortunately the Duravit families have dozens of text parameters, which would be very laborious to link. My first thought was to make the nested component shared, but that resulted in some rather odd behaviour. The nested component becomes invisible when shared. I guess the logic is that it is actually a wall-hosted element, but you have made it's host invisible. If you disable the visibility of an element from within family editor, you are basically excluding it from the project. It won't schedule for example. If you delete a wall, you will also delete any hosted elements. So Revit is refusing to recognize a wall-hosted element that has no host.
Now both Luke and Karam mention another hack for switching hosting behaviour. This uses the Copy-Monitor feature, and was described by Dave Baldaccino way back in 2014
http://do-u-revit.blogspot.ae/2014/03/creating-non-hosted-families-from.html
This turned out to be a very simple way of converting my Duravit content because I already have a collection file. Simply link this into a blank project and run copy-monitor in batch mode for the plumbing category only. This creates a new collection file where all the wall-hostel elements have become face-based.

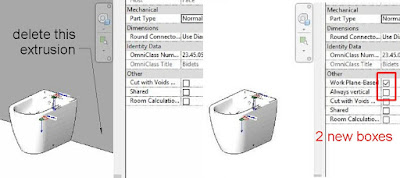
Now for the magic part. Dave mentioned in his post that if you delete the extrusion in a face-based family, it becomes a normal unhosted element. You can see this immediately in the properties dialogue which sprouts two new parameters. (tick boxes for workplane based and always vertical)
This set me off on a little adventure, cleaning up one row of my collection to make them "how I would have done it ". There are several steps.
1. Delete the extrusion
2. Adjust the origin
3. Standardise layer names
4. Shorten family names

For the families that are already un-hosted I only needed steps 3 & 4. Similarly for the face based"vanity basins" which have a void in them to cut a hole into whatever surface they are placed on. I saw no reason to make a second version of these without the extrusion.
Just for fun, I took one of the unhosted families and nested it into a wall based template, making the nested element shared so that you get all the parameters. Seems to me that's how they should all be made. Then you can have wall hosted and free-standing versions in the same project that schedule correctly as being the same item. You could even make a third, floor hosted version if you really wanted. Perhaps you might need to place several of them on areas of raised flooring, split level bathrooms if you like.

Since I developed my modular door families I have started to see other applications for the same principles. Windows, obviously, but also classical columns where you might want to mix and match shafts and capitals, switch between different templates (architectural v structural, one level v two level) That's another post I think. Probably several. There will be another soon about classical columns, but also I think I should develop a modular approach to plumbing families.
Let's just set the scene with a little teaser.
Aaron Maller has weighed in with his firmly held belief that all symbolics are bad. Not sure if he extends this as far as door swings, that may be the one exception that puts his rule "to the test". (the original meaning of proves)
I agree with him that native geometry should be used for plans and elevations wherever possible. Don't spray masking regions and symbolic lines all over the place for no good reason. The geometry will always give you more predictable results. You won't see the front when it should be the back for example.
Using the geometry will work for relatively simple geometry and sharp edges. It won't look so good with smooth, rounded forms and complex curves. These are common shapes plumbing fixtures and soft furniture, resulting in lines of variable thickness that fade away to nothing in places. Your client on the other hand may be expecting crisp, even lineweights.

Another advantage of symbolics is the level of control you get for different scales. You can express a narrow groove as a single line at medium scale, and as two lines at fine. In the geometry, that groove is probably not a separate element. You can't control it's graphics independently for different scales. The whole thing is either on or off.
I doubt that I have convinced Aaron yet and I'm open to learning how to further reduce the need for symbolics, but here's a diagram of my idea for modular plumbing families.

You separate out the geometry and the symbolics as two nested families. That way it's easy to switch off the symbolics if you prefer. For the geometry you can have different versions that you swap out depending on need and preference. Heavyweight v Lightweight, Mesh v Solid, CAD import v Native Revit, fixed v parametric. The resultant plumbing family can stand on its own, or you could choose to nest it into a hosted template. This hosting family would be a kind of ghost object, not counted in schedules.

I intend to develop this further in a future post. The idea is to make families more flexible, easy to change the hosting behaviour, easy to switch between lightweight and heavyweight versions, respond to individual preferences & project requirements.
So thankyou Karam, and all the other guys who contributed to this thought process which has progressed my understanding of hosted families considerably and occupied me productively, playing with Revit for a couple of days. What joy!
I will sign off with a compilation of pictures from my only visit to Jordan, which was in 2011. I really enjoyed the city of Amman, although my stay was far too brief. It has a sense of history and culture that is harder to find here in Dubai.

Karam's Gallery

I was particularly impressed with his model of Gerrit Reitveld's Schroder House, a building that has fascinated me for about 50 years now. I did start to model it on 2011, but didn't get very far.

Karam appears to have captured it in the most exquisite detail. I would love to talk about this topic at length, but that will have to be another day. Here is Karam's version

I did write a short piece about the house in 1991 as a History assignment when I was a "mature student" in Joburg, returning to Architecture after a 16 year detour through bricklaying and education. Here is my analysis of the site (hand drawn though I had started to use AutoCAD by then). Mrs Schroder was a young widow, living on the edges of middle class society, both literally and metaphorically. She an Reitveld collaborated to create a very unusual house for a single parent. It turned it's back to the conventional world, looking out over open fields and catching the sun through open corners.

A second, hand-drawn diagram describes the planning: a dense, cellular ground floor, with an open-plan, flexible living space above. As I remember, she rented out the guest room at the back to a lodger for extra income, which is why it is isolated from the rest of the house with its own entrance.

I couldn't resist including the concluding paragraph of my assignment here, which conveys the significance I attached to this project at that time when I was coming in from the wilderness to rejoin the profession, somewhat reluctantly after an extended period of teenage rebellion.

But back to Karam. He has developed a method for switching the hosting style of Revit families which is well worth a look. I first became aware of this via a post by Luke Johnson. It's based on a hack that's been around for many years which allows you to create loadable families that belong to system categories.
What Revit Wants
You start by creating an in-place family. Let's say you choose to make it a ceiling. If you make a group within that family, that group will appear in the Project Browser (under Groups). Now you can save a group out to an external file, and normally this would be a project. This is the basis of the "binding" workflow that allows you to convert links to groups and vice versa.
But, if you save the group while in edit mode, it becomes an RFA file, with the same category as the in-place family from which it originated. Voila! A most ingenious trick with unknown and potentially dangerous consequences.
Karam has created 4 such families and nested them into a generic model template.

Now if you load a ceiling hosted family, it will attach itself to the ceiling object. Delete the other 3 system elements, adjust the origin and save. You now have an un-hosted version of your original hosted family. You can watch Karam's video for further clarification.
Kconvert Video
It's very useful if you want a window to lie in the plane of a sloping wall or roof, for example. The down side is that you have to link through all the parameters (something that Karam does at lightning speed in his video) and of course you get an extra layer of nesting, plus the fact that this is an unsupported hack.
Actually you get two extra layers of nesting if you want it to be face based. The saved "Kconvert" with the wall-hosted object trapped inside will come in perpendicular to whatever face you place it on. Haven't quite figured out the logic of this, but Karam recommends nesting this into a face-based template and adding a void extrusion to cut your hole. More linking of parameters, and it will insert itself into almost anything. Quite neat.

Give it a go and see what you think. It may come in handy if you have a number of families that you really don't want to remake from scratch. Let's say they are wall-hosted windows that you want to convert to roof lights.
Just in passing, my own approach to flexible hosting is to make families as un-hosted elements in the first place, then nest these into whichever template you need. There are two solutions to the parameter linking chore. You can make your nested component a shared family, or you can develop a system of standardized parameters and fixed naming of nested elements.

This is the basis of my modular door families which I presented as a lab in Porto and will also be sharing at BiLT Asia in Singapore.
Returning to Karam's method, I wondered if this would help me to unhost the Duravit families I reviewed recently. You might not want these to be wall hosted. Let's say you want to mount them on timber panels for example. Or maybe you want to nest them into a family that incorporates a concealed system, boxed out with a tile facing and a marble shelf.

Unfortunately the Duravit families have dozens of text parameters, which would be very laborious to link. My first thought was to make the nested component shared, but that resulted in some rather odd behaviour. The nested component becomes invisible when shared. I guess the logic is that it is actually a wall-hosted element, but you have made it's host invisible. If you disable the visibility of an element from within family editor, you are basically excluding it from the project. It won't schedule for example. If you delete a wall, you will also delete any hosted elements. So Revit is refusing to recognize a wall-hosted element that has no host.
Now both Luke and Karam mention another hack for switching hosting behaviour. This uses the Copy-Monitor feature, and was described by Dave Baldaccino way back in 2014
http://do-u-revit.blogspot.ae/2014/03/creating-non-hosted-families-from.html
This turned out to be a very simple way of converting my Duravit content because I already have a collection file. Simply link this into a blank project and run copy-monitor in batch mode for the plumbing category only. This creates a new collection file where all the wall-hostel elements have become face-based.

Now for the magic part. Dave mentioned in his post that if you delete the extrusion in a face-based family, it becomes a normal unhosted element. You can see this immediately in the properties dialogue which sprouts two new parameters. (tick boxes for workplane based and always vertical)

This set me off on a little adventure, cleaning up one row of my collection to make them "how I would have done it ". There are several steps.
1. Delete the extrusion
2. Adjust the origin
3. Standardise layer names
4. Shorten family names

For the families that are already un-hosted I only needed steps 3 & 4. Similarly for the face based"vanity basins" which have a void in them to cut a hole into whatever surface they are placed on. I saw no reason to make a second version of these without the extrusion.
Just for fun, I took one of the unhosted families and nested it into a wall based template, making the nested element shared so that you get all the parameters. Seems to me that's how they should all be made. Then you can have wall hosted and free-standing versions in the same project that schedule correctly as being the same item. You could even make a third, floor hosted version if you really wanted. Perhaps you might need to place several of them on areas of raised flooring, split level bathrooms if you like.

Since I developed my modular door families I have started to see other applications for the same principles. Windows, obviously, but also classical columns where you might want to mix and match shafts and capitals, switch between different templates (architectural v structural, one level v two level) That's another post I think. Probably several. There will be another soon about classical columns, but also I think I should develop a modular approach to plumbing families.
Let's just set the scene with a little teaser.
Aaron Maller has weighed in with his firmly held belief that all symbolics are bad. Not sure if he extends this as far as door swings, that may be the one exception that puts his rule "to the test". (the original meaning of proves)
I agree with him that native geometry should be used for plans and elevations wherever possible. Don't spray masking regions and symbolic lines all over the place for no good reason. The geometry will always give you more predictable results. You won't see the front when it should be the back for example.
Using the geometry will work for relatively simple geometry and sharp edges. It won't look so good with smooth, rounded forms and complex curves. These are common shapes plumbing fixtures and soft furniture, resulting in lines of variable thickness that fade away to nothing in places. Your client on the other hand may be expecting crisp, even lineweights.

Another advantage of symbolics is the level of control you get for different scales. You can express a narrow groove as a single line at medium scale, and as two lines at fine. In the geometry, that groove is probably not a separate element. You can't control it's graphics independently for different scales. The whole thing is either on or off.
I doubt that I have convinced Aaron yet and I'm open to learning how to further reduce the need for symbolics, but here's a diagram of my idea for modular plumbing families.

You separate out the geometry and the symbolics as two nested families. That way it's easy to switch off the symbolics if you prefer. For the geometry you can have different versions that you swap out depending on need and preference. Heavyweight v Lightweight, Mesh v Solid, CAD import v Native Revit, fixed v parametric. The resultant plumbing family can stand on its own, or you could choose to nest it into a hosted template. This hosting family would be a kind of ghost object, not counted in schedules.

I intend to develop this further in a future post. The idea is to make families more flexible, easy to change the hosting behaviour, easy to switch between lightweight and heavyweight versions, respond to individual preferences & project requirements.
So thankyou Karam, and all the other guys who contributed to this thought process which has progressed my understanding of hosted families considerably and occupied me productively, playing with Revit for a couple of days. What joy!
I will sign off with a compilation of pictures from my only visit to Jordan, which was in 2011. I really enjoyed the city of Amman, although my stay was far too brief. It has a sense of history and culture that is harder to find here in Dubai.