Half a lifetime ago I was enjoying my dream job, writing
text books about Building for school students in Zimbabwe. It may seem strange
that Building is a subject on the timetable, alongside Mathematics and History,
but that’s the way things are in Southern Africa ... and why not?
In my view, Building Studies provided a perfect vehicle for integrating concepts from other school subjects and helping students to apply their knowledge to real-life situations.
This post looks at a booklet I wrote and illustrated long ago. I should acknowledge Malcom Davis who was my colleague and collaborator. We had a very productive partnership with complementary skills and ideas. Unfortunately, he had a serious car accident around this time, and we never quite recovered that early magic again before I moved on to another role, teaching at the university.

We planned a series of five booklets, but only completed three. This was the last one to go out of the door, and the first one where we used a computer to generate the text. Bye bye Tippex :) We had access to a BBC Micro with a tiny little screen and an external floppy drive. You needed 3 floppy disks to store a megabyte of data! The text was printed out on a “daisy wheel” printer. I think we had the choice of two fonts.

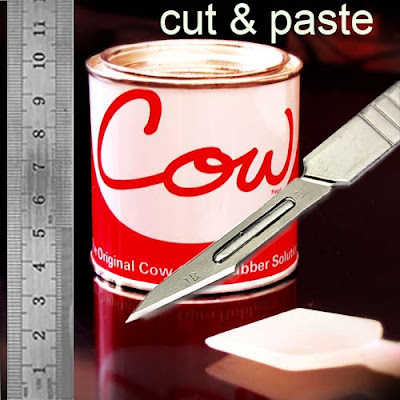
The layout was done using “cut and paste” in the original, literal sense of steel rule, scalpel, and cow gum. I don’t have the original art work. The booklets were printed on news print and my copies are brown at the edges by now. I have tried my best to clean them up, adding colour here and there to emphasize our attempts to present the course as a series of activities and discussions. In some cases I have recreated the panels using more modern software tools.
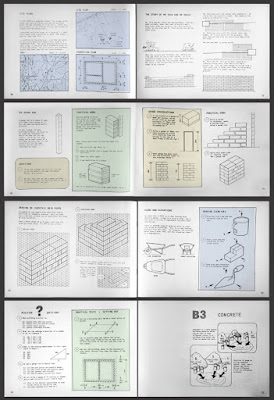
Module A was called First Steps and introduced basic skills like handling a bricklayer's trowel, safety on site, drawing … as well as thinking about buildings more broadly. Why are houses built differently in different countries and climates? Module B begins to take the students sequentially through the process of building a small house. The first few pages introduce the idea of a Building Site. We try to make links to Maths, Science & Language with activities of various kinds.

By the time this book came back from the printers I had the idea of formalizing the different activity types in the book and creating a graphic symbol to represent each of them. Little Icons to highlight the idea of creating a varied sequence of experiences. Group discussions were one of these activity types. How do you go about choosing a good site for a building? The drawing is based on my experience of Rural Zimbabwe, an inspiring landscape for me at the time. All done with a set pf Rotring pens, my trusty little tool box.
Waves of nostalgia as I try to remember the process of thinking up a drawing like this. Clearly some effort went in to making each house slightly different, but also believable as the kinds of structure you would see out in the rural areas. Some strong hints about the advantages and disadvantages of different locations. I wonder how many teachers tried to do this exercise? We were conscious that rote learning was the norm in most schools, so the idea of pupils sitting in small groups and talking to each other was quite edgy.

The next activity was more physical and outdoor, but still rather different from the formulaic approach many teachers would have been used to. We were trying to blur the boundaries with other subjects like science and geography. What is in soil? How does it change as you go deeper? Why would you want to move away the organic material in the top layer? The traditional approach would be to give answers to all these questions, (wisdom from above) and perhaps have the students copy down notes in their exercise books. Then follow up with a test a few weeks later.

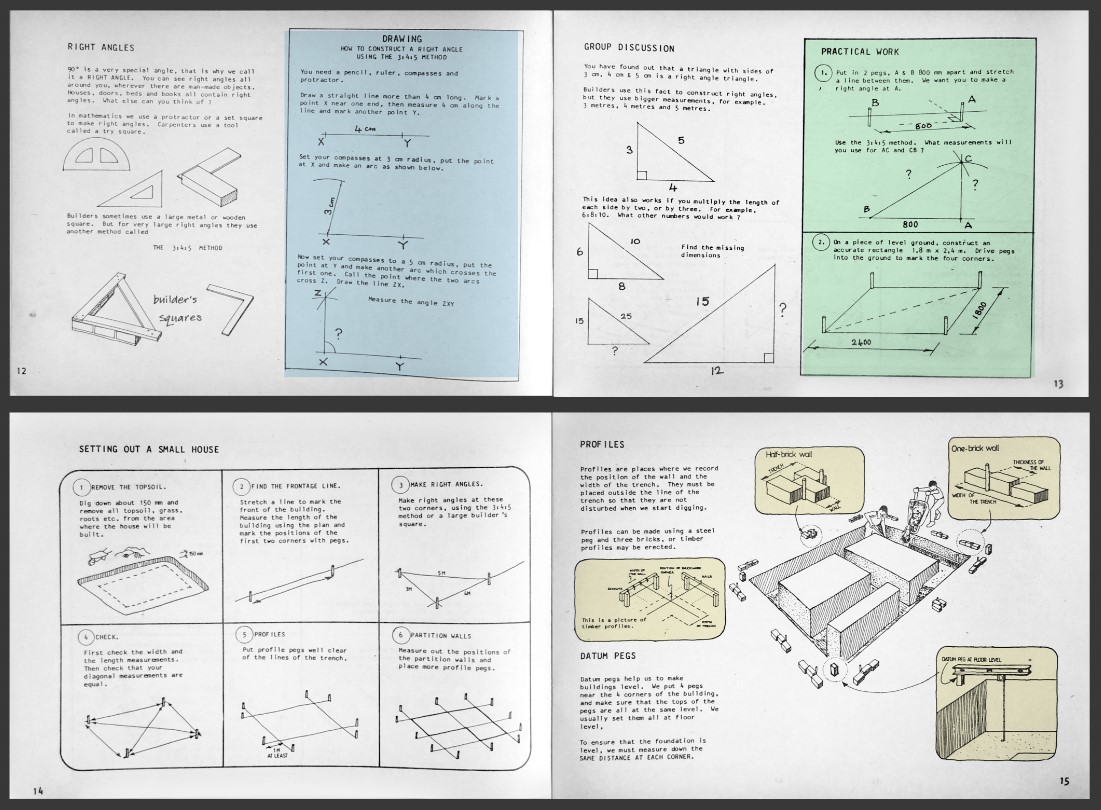
I first learned about setting out around 1975 when I was re-training as a bricklayer, having abandoned the idea of becoming an architect. I found it really exciting, a link between my academic childhood and the practical world of building trades that I was determined to master. We devised a set of exercises that could be done in groups with very basic equipment (a few short lengths of steel bar, some fishing line and a tape measure, plus a hammer.) We did these a couple of times with groups of trainee teachers and they seemed to work well. What's that saying? "I listen and I forget, I see and I remember, I do and I understand." Something like that.

The idea of a straight line seems very trivial, but in evolutionary terms it is a relatively recent feature of human experience. The three techniques illustrated in the next drawing are archetypal really. The laser beam is new perhaps, but it’s a beam of light like the boning rods example shown below. “A good eye” is an expression you will often hear artisans using. As David Hockney likes to say “you have to look, really look.” I have spent so much of my life looking at buildings and trying to understand them. But who knows when I will be able to travel to a historic city again?

From simple techniques like stretching a piece of string, to the abstraction of regular polygons and Pythagoras theorem. “Learning by doing” sums up our existence in many ways. I was enthused with the idea of conveying the processes and activities involved in building a house. Regular textbooks seemed to be too static. You see the end product, but the excitement of how it is conjured into being … that’s much harder to convey. In these days of smart phones and video clips I guess it’s much easier. But maybe there is still something to be said for the simplicity of a line drawing, the clarity of a well composed page.

The traditional course that we were trying to develop into something more exciting was basically about training young boys to become bricklayers. Take those who are not academically inclined and get them used to the discipline of manual work. I’m not sure that our good intentions were always well directed. We were naïve young westerners excited by the chance to show off. But the next group of pages includes our attempts to integrate the old bricklaying core back into a new, more ambitious and open-ended course of study. We saw the subject as something with value to offer to students of different ability levels. Some would become artisans, some engineers or architects, some entrepreneurs perhaps.
I was trying to combine my drawing ability with a decade of practical building experience. My head was full of ideas. A few years later I would get excited about Desktop Publishing … the promise of virtual layout tools. Sadly the ability to draw directly into the computer lagged behind by a couple of decades. In practical terms at least. I tried several devices over the years but it's only been in the past 2 or 3 years that drawing directly into my phone or tablet has come to rival pencil and paper, as a medium for visual thinking.
There is so much to talk about here. I was very proud of “The Story of Mr Thick & Mr Thin” Perhaps you have to have gone through the pain of trying to keep all four corners of a building going up at the same rate to fully grasp the poignancy of that tale. Drawing has always been such an important part of my life and I was consumed by the idea of using everyday objects to explain the idea of orthographic views.
How do you teach problem-solving skills? That was much on our minds. How to present “technical drawing” as a series of games and puzzles. You can do the same kind of thing with bonding patterns in brickwork. Old Mr Cox, who taught me to lay bricks at the government re-training centre in Sheffield, used to throw bonding problems at us whenever we had spare bits of time left over. I used to love those challenges.

On it goes. Dig the trenches, pour the concrete, watch the little house coming into being. And at each step, pause to consider some interesting skill or principle that underpins the work of creating a home for a family. How many batches of concrete or bricklaying mortar did I mix by hand in my youth? Such a simple pleasure. I don’t think my back would allow me to do that now. Standing upright is a wonderful thing, but there are always trade-offs to consider. Our body-plan is a recipe for lower-back pain in old age.

Next comes another discussion panel that gave me a great deal of satisfaction at the time. We toyed with the idea of coordinating the syllabus of various subjects so that, for example, pressure could be dealt with jointly in building and science. I'm not sure this was a workable idea. Foundations come early in a building course for sequential reasons. Pressure may well fit into the science curriculum much later. Better to think in terms of cycles of learning perhaps. A concept like pressure matures in our minds over a period of years as we encounter it in different contexts. Is it better to learn the theory first and then back it up with practical examples, or the other way around?
Maybe it’s even messier than that. Our minds are not systematically ordered like a Wikipedia database. Perhaps that’s the secret to our flashes of inspiration and creativity. Stuff just happens. Go with the flow.

The last section of the book is devoted to a series of exercises. Some of them are simulations of physical site activities, some involve drawing, others are written tests. They are intended as preparation for the public exams that took place half-way through secondary school at that time. I don’t know what the current situation is.
I acted as chief examiner for this subject for a couple of years including going out to remote schools to mark small pieces of brickwork and moderate the work of marking teams. It was all very exciting and I fully expected to remain in education for many years … but life has its own agenda. I moved on to working at the university for a couple of years, then faced another inflection point and decided to give architecture another shot.

The clarity and simplicity of the original line drawings fills me with nostalgia. Will I ever recapture that level of fluency? Photographs are great, but there is something about a line drawing. You can focus attention on the things that matter. Photorealism precludes that. Too much information.
These images are captured using my Samsung Note 8 and cleaned up in photoshop. It is quite time consuming to paint out the grainy grey background. You can enhance the contrast to some extent but the paper is so faded that you can’t make the background white without losing detail in the pen strokes. I have started to experiment with ways of using this effect to my advantage, resulting in an effect of grey-tone washes that highlight the 3 dimensional form or indicate differences of material.

Having done a quick mock-up for this post, I decided to set about a more serious reconstruction of module B using modern page layout software. I think I have reached about half way with this exercise, completely retyping the text and cleaning up the images one-by-one. I always intended to come back and complete the whole 5 booklet set in a consistent format, based on Module B. More than 30 years later Covid19 may be giving me the opportunity.
It’s a daunting task, but who knows? I would try to maintain the pedagogic style as it was in 1986. For sure my ideas have moved on in 34 years, but I am also quite remote from the Zimbabwe school system, and to rethink the whole thing for a different target group would just be like starting from scratch really. I need to restrict my ambitions to have any chance of completing the task.
Let’s see how things go. So many projects lying around in a half-completed state across my hybrid memory banks. (eye roll)

In my view, Building Studies provided a perfect vehicle for integrating concepts from other school subjects and helping students to apply their knowledge to real-life situations.
This post looks at a booklet I wrote and illustrated long ago. I should acknowledge Malcom Davis who was my colleague and collaborator. We had a very productive partnership with complementary skills and ideas. Unfortunately, he had a serious car accident around this time, and we never quite recovered that early magic again before I moved on to another role, teaching at the university.

We planned a series of five booklets, but only completed three. This was the last one to go out of the door, and the first one where we used a computer to generate the text. Bye bye Tippex :) We had access to a BBC Micro with a tiny little screen and an external floppy drive. You needed 3 floppy disks to store a megabyte of data! The text was printed out on a “daisy wheel” printer. I think we had the choice of two fonts.

The layout was done using “cut and paste” in the original, literal sense of steel rule, scalpel, and cow gum. I don’t have the original art work. The booklets were printed on news print and my copies are brown at the edges by now. I have tried my best to clean them up, adding colour here and there to emphasize our attempts to present the course as a series of activities and discussions. In some cases I have recreated the panels using more modern software tools.

Module A was called First Steps and introduced basic skills like handling a bricklayer's trowel, safety on site, drawing … as well as thinking about buildings more broadly. Why are houses built differently in different countries and climates? Module B begins to take the students sequentially through the process of building a small house. The first few pages introduce the idea of a Building Site. We try to make links to Maths, Science & Language with activities of various kinds.

By the time this book came back from the printers I had the idea of formalizing the different activity types in the book and creating a graphic symbol to represent each of them. Little Icons to highlight the idea of creating a varied sequence of experiences. Group discussions were one of these activity types. How do you go about choosing a good site for a building? The drawing is based on my experience of Rural Zimbabwe, an inspiring landscape for me at the time. All done with a set pf Rotring pens, my trusty little tool box.
Waves of nostalgia as I try to remember the process of thinking up a drawing like this. Clearly some effort went in to making each house slightly different, but also believable as the kinds of structure you would see out in the rural areas. Some strong hints about the advantages and disadvantages of different locations. I wonder how many teachers tried to do this exercise? We were conscious that rote learning was the norm in most schools, so the idea of pupils sitting in small groups and talking to each other was quite edgy.

The next activity was more physical and outdoor, but still rather different from the formulaic approach many teachers would have been used to. We were trying to blur the boundaries with other subjects like science and geography. What is in soil? How does it change as you go deeper? Why would you want to move away the organic material in the top layer? The traditional approach would be to give answers to all these questions, (wisdom from above) and perhaps have the students copy down notes in their exercise books. Then follow up with a test a few weeks later.

I first learned about setting out around 1975 when I was re-training as a bricklayer, having abandoned the idea of becoming an architect. I found it really exciting, a link between my academic childhood and the practical world of building trades that I was determined to master. We devised a set of exercises that could be done in groups with very basic equipment (a few short lengths of steel bar, some fishing line and a tape measure, plus a hammer.) We did these a couple of times with groups of trainee teachers and they seemed to work well. What's that saying? "I listen and I forget, I see and I remember, I do and I understand." Something like that.

The idea of a straight line seems very trivial, but in evolutionary terms it is a relatively recent feature of human experience. The three techniques illustrated in the next drawing are archetypal really. The laser beam is new perhaps, but it’s a beam of light like the boning rods example shown below. “A good eye” is an expression you will often hear artisans using. As David Hockney likes to say “you have to look, really look.” I have spent so much of my life looking at buildings and trying to understand them. But who knows when I will be able to travel to a historic city again?

From simple techniques like stretching a piece of string, to the abstraction of regular polygons and Pythagoras theorem. “Learning by doing” sums up our existence in many ways. I was enthused with the idea of conveying the processes and activities involved in building a house. Regular textbooks seemed to be too static. You see the end product, but the excitement of how it is conjured into being … that’s much harder to convey. In these days of smart phones and video clips I guess it’s much easier. But maybe there is still something to be said for the simplicity of a line drawing, the clarity of a well composed page.
The traditional course that we were trying to develop into something more exciting was basically about training young boys to become bricklayers. Take those who are not academically inclined and get them used to the discipline of manual work. I’m not sure that our good intentions were always well directed. We were naïve young westerners excited by the chance to show off. But the next group of pages includes our attempts to integrate the old bricklaying core back into a new, more ambitious and open-ended course of study. We saw the subject as something with value to offer to students of different ability levels. Some would become artisans, some engineers or architects, some entrepreneurs perhaps.
I was trying to combine my drawing ability with a decade of practical building experience. My head was full of ideas. A few years later I would get excited about Desktop Publishing … the promise of virtual layout tools. Sadly the ability to draw directly into the computer lagged behind by a couple of decades. In practical terms at least. I tried several devices over the years but it's only been in the past 2 or 3 years that drawing directly into my phone or tablet has come to rival pencil and paper, as a medium for visual thinking.

There is so much to talk about here. I was very proud of “The Story of Mr Thick & Mr Thin” Perhaps you have to have gone through the pain of trying to keep all four corners of a building going up at the same rate to fully grasp the poignancy of that tale. Drawing has always been such an important part of my life and I was consumed by the idea of using everyday objects to explain the idea of orthographic views.
How do you teach problem-solving skills? That was much on our minds. How to present “technical drawing” as a series of games and puzzles. You can do the same kind of thing with bonding patterns in brickwork. Old Mr Cox, who taught me to lay bricks at the government re-training centre in Sheffield, used to throw bonding problems at us whenever we had spare bits of time left over. I used to love those challenges.

On it goes. Dig the trenches, pour the concrete, watch the little house coming into being. And at each step, pause to consider some interesting skill or principle that underpins the work of creating a home for a family. How many batches of concrete or bricklaying mortar did I mix by hand in my youth? Such a simple pleasure. I don’t think my back would allow me to do that now. Standing upright is a wonderful thing, but there are always trade-offs to consider. Our body-plan is a recipe for lower-back pain in old age.

Next comes another discussion panel that gave me a great deal of satisfaction at the time. We toyed with the idea of coordinating the syllabus of various subjects so that, for example, pressure could be dealt with jointly in building and science. I'm not sure this was a workable idea. Foundations come early in a building course for sequential reasons. Pressure may well fit into the science curriculum much later. Better to think in terms of cycles of learning perhaps. A concept like pressure matures in our minds over a period of years as we encounter it in different contexts. Is it better to learn the theory first and then back it up with practical examples, or the other way around?
Maybe it’s even messier than that. Our minds are not systematically ordered like a Wikipedia database. Perhaps that’s the secret to our flashes of inspiration and creativity. Stuff just happens. Go with the flow.

The last section of the book is devoted to a series of exercises. Some of them are simulations of physical site activities, some involve drawing, others are written tests. They are intended as preparation for the public exams that took place half-way through secondary school at that time. I don’t know what the current situation is.
I acted as chief examiner for this subject for a couple of years including going out to remote schools to mark small pieces of brickwork and moderate the work of marking teams. It was all very exciting and I fully expected to remain in education for many years … but life has its own agenda. I moved on to working at the university for a couple of years, then faced another inflection point and decided to give architecture another shot.

The clarity and simplicity of the original line drawings fills me with nostalgia. Will I ever recapture that level of fluency? Photographs are great, but there is something about a line drawing. You can focus attention on the things that matter. Photorealism precludes that. Too much information.
These images are captured using my Samsung Note 8 and cleaned up in photoshop. It is quite time consuming to paint out the grainy grey background. You can enhance the contrast to some extent but the paper is so faded that you can’t make the background white without losing detail in the pen strokes. I have started to experiment with ways of using this effect to my advantage, resulting in an effect of grey-tone washes that highlight the 3 dimensional form or indicate differences of material.

Having done a quick mock-up for this post, I decided to set about a more serious reconstruction of module B using modern page layout software. I think I have reached about half way with this exercise, completely retyping the text and cleaning up the images one-by-one. I always intended to come back and complete the whole 5 booklet set in a consistent format, based on Module B. More than 30 years later Covid19 may be giving me the opportunity.
It’s a daunting task, but who knows? I would try to maintain the pedagogic style as it was in 1986. For sure my ideas have moved on in 34 years, but I am also quite remote from the Zimbabwe school system, and to rethink the whole thing for a different target group would just be like starting from scratch really. I need to restrict my ambitions to have any chance of completing the task.
Let’s see how things go. So many projects lying around in a half-completed state across my hybrid memory banks. (eye roll)