Friday, April 30, 2021

BONDING GAMES

I have been working on my modular bricklaying families.  How many components do I need? Can I evolve a system that works consistently for different bonding patterns and wall thicknesses?  How can I reduce the chaos in a naming system that “just growed” as I fumbled my way into this exercise?

Don’t have all the answers yet, but definitely making progress.  Some of these families are fixed size with visibility parameters.  Some of them incorporated linear arrays so you can type in the number of bricks you want on the first course.  The individual families are being laid out on a rectangular grid, with model text for seeing the names in 3d, and tags in a plan view for cross-checking.


Finding the right balance between parametric behaviour and simplicity of use can be tricky.  I find it helps to play with my baby-bricks collection from time to time.  Take a break from the abstraction of the virtual world.

Flemish Bond is generally agreed to be the prettiest of the two main approaches to binding stretchers together in thick wall construction.  But it is also quite demanding and looks a little odd in shorter lengths between windows unless you are quite ruthless about the lengths that you allow.  Two and a half bricks is good, for example, but three bricks wide is a nightmare.  There are different solutions, but none of them is going to give you the kind of symmetry you would like to see.


Above the grid of components, I have a working space to play at combining them together in different ways.  The example below is for Stretcher Bond, which is the simplest, and limited to half-brick walls. One thing to bear in mind is that I need to show walls in the process of being built, with corners racked back and so on. 

I’m doing all this for myself so I guess I could make the parameters really complicated, but from past experience that’s a bit of a mistake.  After 15 years of using Revit I have plenty of experience of coming back to work I did several years previously and struggling to understand how I set up the families.  So I am trying to keep things simple and consistent, avoid expecting any one family to cover too many different situations.  Don’t try to get too clever.  That’s a rule that I take pretty seriously.

And who knows, people may be interested in playing with my system themselves.  I have no problem in sharing the system once I have it working pretty well.


I dug back into my records and found a picture of some of my class mates at the Training Centre in Handsworth (Sheffield) where I learnt to lay bricks from a fascinating old guy called Mr Cox. I wonder where they all are now.  I’m pretty sure they will have stayed close to home, but I don’t mean “where” in a literal sense.  I wish I could get in touch with John Hobson again.  We became close friends and set up a bricklaying gang together.  But after I moved to Zimbabwe that connection was lost. 

I kept a notebook in my pocket in those days, and I have digital copies of those covering about 20 years of my life, up until computer files started to take over. There are little sketches mixed up with diary entries and general musings on life. I found a sketch of mortar on a “spot board” and a piece of decorative brickwork, including a brick-on-edge roll.  That was an exercise we did towards the end of the course.  I can still remember Mr Cox demonstrating that with a big smile on his face.  Around this time I bought my first house.  It was down the road from the Sheffield United football ground and was scheduled for demolition.  I was able to buy it from the town council at a knock-down price with a guarantee that they would buy it back at market rates a few years later.  I guess it was a way of protecting my neighbours, (who were tenants) from having a derelict house next door.

For me it was a great way to get on the property ladder.  I borrowed some money from my parents which I was able to pay back over the next year or so.  


There was an interesting post on Linked In this week by Jeremy Murphy of KingsRock Joinery.  It’s a garden wall built by Winston Churchill.  I was aware that he used bricklaying as a way to deal with his periodic bouts of depression.  He also painted.  I don’t suffer from depression, but I have been doing something similar to bring balance to my life, partly as a response to the pandemic.  Visual thinking and doing little craft projects (decorative plaster, woodworking)  I think anyone doing office work could benefit from similar activities.

Anyway this wall of Winston’s turned out to be Flemish Garden Wall bond.  I haven’t tackled that in Revit yet, but it’s a great bond for keeping a fair face on both sides of the wall.  Bricks vary in size, and this shows up in the headers that pass through the full thickness of the wall, tying it together.  A row of headers will always look a bit ragged on the reverse side, but if the headers are spread out the differences are less obvious.

I have blown up a portion of the wall and altered the coloration of the headers to make the bond easier to read. 


The interplay between the world of ideas, physical activity and freehand sketching has enriched my life in so many ways as I have moved between different careers and moved to new locations, on different continents.  I really enjoy looking back at the little sketches from my time training as a bricklayer and then working on building sites. It’s almost like looking at the work of a different person by now. 

Merging myself back into the working class as a dropped-out architecture student who felt that I was participating in a renewal of society, belonging to a generation that was breaking through into new ways of living and working.  Strange to look back at that now, but it was invigorating at the time.  Surviving on building sites was very challenging at first. I had to really work at the manual skills, but also the interpersonal stuff, after four years of living in London with students and people from middle-class backgrounds.

My own family was in transition.  We lived in the industrial north and most of the people we knew worked with their hands, but my father was able to retrain as an art teacher after the second world war.  In a way I have been an outsider ever since I went to university.  At architecture school my classmates were mostly from a professional background and the south of England.  I enjoyed that but it made me aware that becoming an architect would take me into social settings that I barely understood.

Ultimately, I chose to head in the opposite direction and “rediscover my working-class roots”.


Returning to 2021 and my life as a 70 year old architect, former teacher, former bricklayer (17 years in Dubai, 23 years in Zimbabwe) … what am I trying to do? 

I think it has to do with weaving the various strands of my life together and using the lessons I have learnt along the way to explore the human condition through the lens of “building” … an ancient communal activity of our species.  I am using the BIM tools that have dominated the past 15 years of my working life, but it’s essential that I also use freehand sketching, visual thinking, and physical, craft activities as part of this enterprise.  Building is a very visceral activity that groups of humans devoted themselves to for entire lifetimes, the passed on to their children and grandchildren. 

We will lose sight of that if we devote ourselves too completely to the digital world.  We can’t afford to let “thinking machines” dominate our lives.  Revit is an amazing tool for me, but I don’t want to be trapped in that bubble.  I am trying to remain connected to the centuries old traditions of building activity that have evolved in so many different cultural and geographical contexts.  Learning by doing. Mind and body inseparable. Hand-Eye-Brain.

And that’s the end of April 2021.  May Day tomorrow.  Workers of the world unite? 😊


Wednesday, April 28, 2021

FRAMING THE CONVERSATION

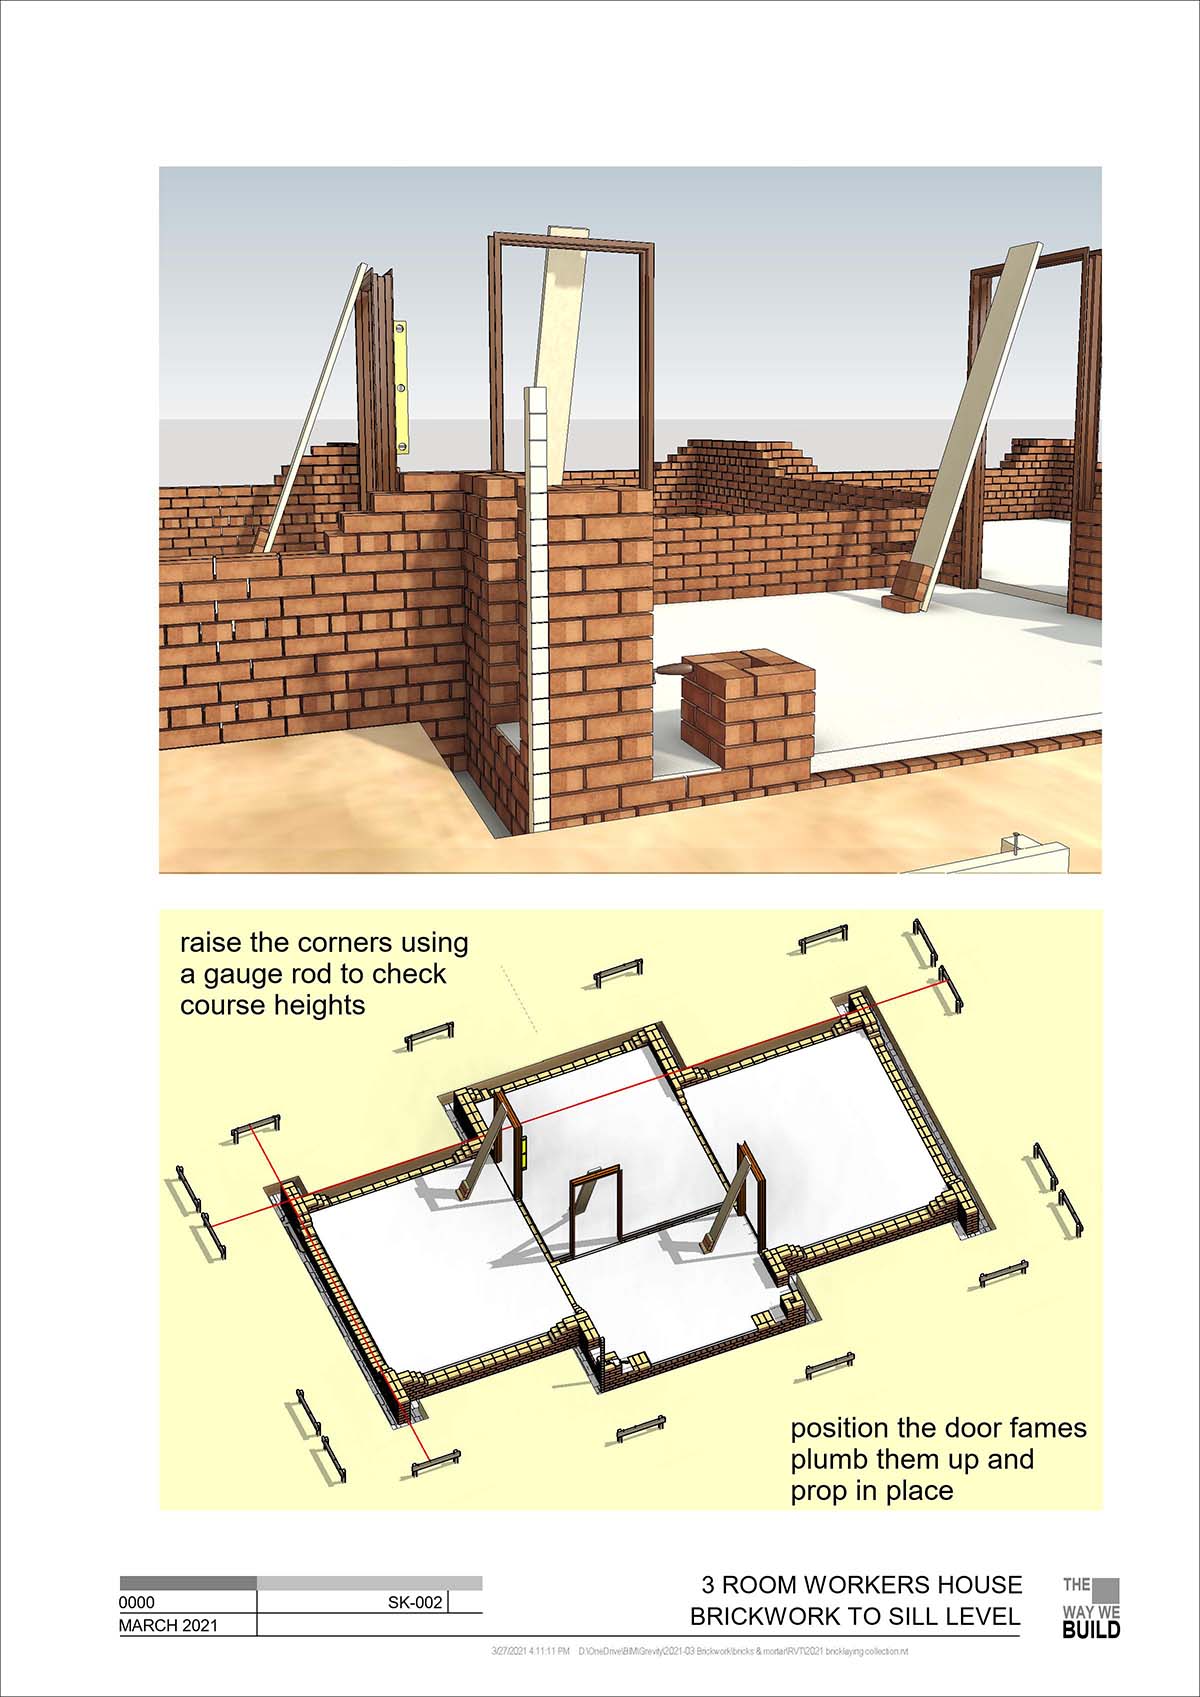
 Pressed metal frames are common in Southern Africa. Simple, robust and built-in as the brickwork proceeds. I created a “frame-only” family, added a plank with a nail at the top to hook over the frame and bricks to weight the base. These hold the frames vertical while you plumb it up, and as you build it in to the wall.  These are not the kinds of families you would make as an architect, or even as a “BIM-enabled” contractor managing projects on site.  My aims are didactic.  I am using my “BIM pencil” to describe the process of building a simple house using traditional craft methods, in a southern African context.


So let’s back-track to the setting-out process that precedes digging foundation trenches. I made a family for “old-school” wooden profiles.  These are used in conjunction with tight lines, (string or nylon fishing line) to mark out the position of the foundation trenches and of the faces of the walls that will be built in those trenches.  Because the profiles are placed well outside the line of the excavations, it’s possible to dig the trenches without disturbing this setting out.


The normal rule of thumb is to have a foundation trench three times as wide as the wall.  This will spread the load.  In a modern setting you would pour a strip of concrete into this trench and level it off with a heavy straitedge.  I rural Zimbabwe it’s common to use a large rocks bedded in mortar.  Then you stretch the lines around using the nail that marks the face of the wall, and plumb down from the line to mark the positions of the corners.  Basically that involves laying a thin layer of mortar and scribing two lines with the point of your bricklaying trowel.

I made a Revit family to represent this using the ability of polylines to stretch parametrically while maintaining a wavy outline.  I could have just made It a fixed size, but where’s the fun in that?


So now, with several phases set up in the model I can show the sequence of activities involved from a variety of different viewpoints and arrange these onto sheets.  This is all “work in progress” but you get the idea of where I’m heading.


I’m going to skip forward again to the setting out of door frames.  We will look at basic bricklaying techniques in another post (corners first, setting out your materials, running in to a line, trowel technique etc)

By the way I set out my house above ground level when I started on this work, and “dug the trenches afterwards.”  This is a classic mistake.  The brickwork on each side of the doorways looked correct, but I didn’t take care to check out the continuity.  Later I found that I had kicked off with a full brick when it should have been a half. 

It’s interesting to me that a digital model throws up some of the same kind of dilemmas as real life.  I guess that’s the whole point of BIM really.  “Measure twice, cut once” translates as “model twice, build once”


I did a study of steel windows about seven years ago.  At that stage I didn’t fully integrate the hinges and casement stays into the frame family, so it was time to give these families an upgrade.  I wouldn’t normally model the fittings when creating a window family, but for this educational exercise I think it adds a touch or realism.

We used to lay a couple of bricks-on-edge with a sand bed to support the window frame will building the lugs into the brick courses.  Then it was easy enough to remove these at a later stage and run a course of sill bricks, or tiles, or whatever the detail was.


I made a comment on LinkedIn last week in relation to the model of Notre Dame that Autodesk have been showing on social media.  It looks like a pretty good model, but I was a bit disappointed to see an article extolling the use of BIM where all the visuals are rendered camera views. One of the great things about a programme like Revit is the choice of view styles that it offers.  Conventional plan and section views extremely powerful and I always try to interleave the real-time renders from Enscape3d with annotated orthographic views.  There’s so much rich information in a BIM model if you think carefully about how to present it all to your audience.


Friday, April 23, 2021

PRAIRIE LIGHTS

 This is the second post in a series on Revit light fixtures and real-time rendering with Enscape3d. The context here is my mission to explore history with BIM, one of the main activities in a project that I call “the way we build “(WWB)  Another strand of WWB looks at building trades, as in my recent work constructing a small house "brick-by-brick."

Some years ago I started modelling Robie House, by Frank Lloyd Wright. I had recently visited Chicago, done the tour, taken photos, and collected drawings on the Web. Wright liked to design everything including the light fittings. Too good an opportunity to miss.  I’m going to start with some exterior views, one of them featuring the warm glow of interior lighting and both of them using the rapid, layered image processing that I described in the previous post on St Anne’s Limehouse.

Frank Lloyd Wright was a big fan of the word “organic” (not referring to vegetables)  Exactly how did he achieve a feeling of looseness and connection-to-nature in a project like this, which is very rectilinear and crisply detailed?  Part of it is in the materials for sure. Do my layered textures help to convey this?  


Let's go inside. I had set up a view of the open-plan, living-dining floor and created Light Fixture families based on those in the photographs I took on site.  I also added a number of items from the Enscape asset library, mostly people and furniture.

The next image summarises the sequence of layers, effects and transparency masks that I used to create the final image at the bottom.  As before I was working rapidly and intuitively, trusting my judgement and mindful of the fact that the Revit model is not final, so I might want to go through this process again. Image processing is fun and gives time to reflect, away from the BIM environment, but don’t make too much of a meal of it.

By the way, the furniture here departs from Wright’s original scheme, although I have tried to select items that are sympathetic to his aesthetic, in a general way.  My goal was to explore the use of lighting families and image processing, not to spend several hours creating furniture families that replicate Wright originals.  If someone wants to go down that route, I'm open to collaboration.


I’m going to throw in a native Revit “realistic” view next.  It’s less atmospheric than my processed exteriors, but still a useful style of view, in my opinion.  For example you might want to discuss the shortcomings of the current Revit model.  Let’s suppose I was touting for collaborators to contribute to this project.  This type of view, when annotated could help to highlight work to be done while retaining a bit of a feel for the actual materials used.

Part of the magic of BIM (I think) is the ability to present the same model in so many different ways.  Photo-real renders are great, but a conventional black & white floor plan opens up another way of understanding the building. Sheets with multiple view types (plan + elevation + schedule) enable a kind of interactive synthesis.  Architects have been doing this kind of thing forever of course, BIM just sources everything from a central data store. 

As an aside, I have to say that I was slightly disappointed to see Autodesk presenting their model of Notre Dame de Paris using rendered images only.  I always think that the best way to illustrate the power of BIM is to use a variety of view styles, from axonometric section box to annotated RCP with call-out details.  No disrespect to the guys who developed my favourite software of course.


But back to Robie House.  I already mentioned the Enscape Assets in my interior shot.  When I look a that view in shaded mode, these assets don’t look so good.  It’s the usual problem of CAD mesh geometry and the visibility of all the triangulation edges.  On the people it just looks a bit weird.  One solution is to over-ride the colour of those edges. If only you could switch off "interior edges" , like we can with floors that have been shape edited to create falls.

My first thought would have been to go to the Entourage category, but for some reason Enscape Assets are all placed in “Planting”.  It’s easy enough to edit the family and change this.  I decided to switch to “Work Plane-Based” also.  I find it easier to adjust the placement of objects when this box is checked.  Also they are less likely to disappear during placement, in my experience.


I think I will do a separate post about my investigations into Enscape Assets.  Nothing very ground-breaking but I carried out some basic experiments which some of you might find interesting.

The bulkhead light in Robie house was fun to make.  As usual I went for medium LOD.  Just enough geometry to look like a typical Wright “circle in square” design.  One of the logos he invented integrates circle, square and cross.  A hint at the Celtic origins he liked to embrace.


I'm going to finish with a pair of images that are less highly processed.  They are both from the same viewpoint but the time of day has been changed so that one of them has sunlight casting across the room at a very low angle.  I have also added a floor-standing lamp of my own invention but somewhat in harmony with the Wright style.  The purpose of this new lamp is to introduce points of interest where things were a bit too bland for my "inner eye".

The upper image fades to grey from right to left.  This creates an interesting effect in the view through the windows on the left side, almost like a pen & ink landscape with distant hills and a misty plane in the middle ground (Wright's beloved Prairie perhaps)

The lower image has a very different feel. There is no sunlight and we are much more conscious of being indoors.  The exterior looks more urban with its muted colours and with subtle reflections of the internal lights.  The processing in this case involves blurring of the image towards both top and bottom, like a depth-of-field effect. So our eyes are drawn to the sharper portion of the image which is a horizontal strip in the middle.  This tends to emphasize the horizontality which characterises Wright's Prairie Style, and it pulls the focus to the heavy masonry of the fireplace which he loved to place at the heart of his homes.

So there you go.  Enscape 3d and artificial lighting as tools in my armory as I explore "the Way We Build" ... pursuing my passion for the history of building, using the power of BIM.