I'm not sure if it's jetlag or severe OCD, but I woke at the crack of dawn this morning with Tuscan columns & rectangular scalable rigs on my mind. Let's be generous and call it a Eureka moment. Not sure why this didn't occur to me earlier, but it is possible to use a rectangular rig to solve the scalable Tuscan dilemma.
New family - Generic Model Adaptive. Make a rectangular rig in an elevation view. Or just download this starter file . . . Rectangular Rig

The rig is set up in front elevation, so bring in a suitable jpeg and scale it to an appropriate size. Mine happens to be six metres high and I set the width of the rig to 750, which seemed to be about right. The next part is a bit tedious, but I had it all done by breakfast time. Actually it's just 6.15 am as I type these words and I'm expecting the alarm to go off at any moment.
Set 3d snapping on and chain off. Now you can created lots and lots of horizontal "rungs". I ended up with around 25 or 26. With a bit of practice you can draw these so that they snap to horizontal (most of the time) but don't worry if you get that "slightly out of alignment" message. They don't actually have to be horizontal for the method to work, although it does give us an unexpected bonus later on as you will see. The alarm is getting annoying so I will have to finish this off later.

2 fried eggs, a shave & a mad dash down Emirates Highway. I'm in the office now and it's only 7.30 so let's continue. Once you have some rungs in place you can start hanging splines on them. Some of them can be drawn directly, the straight bits might be better created by selecting 2 points and doing a "spline through points". The hardest parts to do are the straight segments with a bit of a curve on the end. Splines are very interactive. Push down on one part of the curve and another part will shoot up. With a few extra points and a bit of practice you can get pretty close.

After I had done most of the capital I decided to test it out. Just selected the spline and did a "create form" The result is a surface and it looks pretty good to me, so on we go.
Actually I was past half way by this stage. ie Most of the complexity in a tuscan column resides in the capital. By the way you may notice that I did a "duplicate view" so that I had a front elevation without the jpeg. This makes it easier to select points & see what you are doing. (I'm still using 2013 by the way) To complete the profile for the revolve you need to draw reference lines on top of reference lines. This is always trick. I wish we had subcategories of reference lines so I could have 2 types with different colours. You can always use the sunglasses & do a temporary hide of the rig. Anyway next thing you know I have a Tuscan column. Looks pretty good, except for the seam. That's one drawback with the conceptual massing revolves, they always come in 2 halves. That's a real shame.

Took it into a project and the elevation view looks fine. None of the artefacts we got with the "scale by spline" in vanilla Revit. And because I took the time to get the ref lines horizontal I can get a dimension chain to pick them up. Just do a callout and up the scale to 1:10 and we have all the dimensions my mould maker might need.

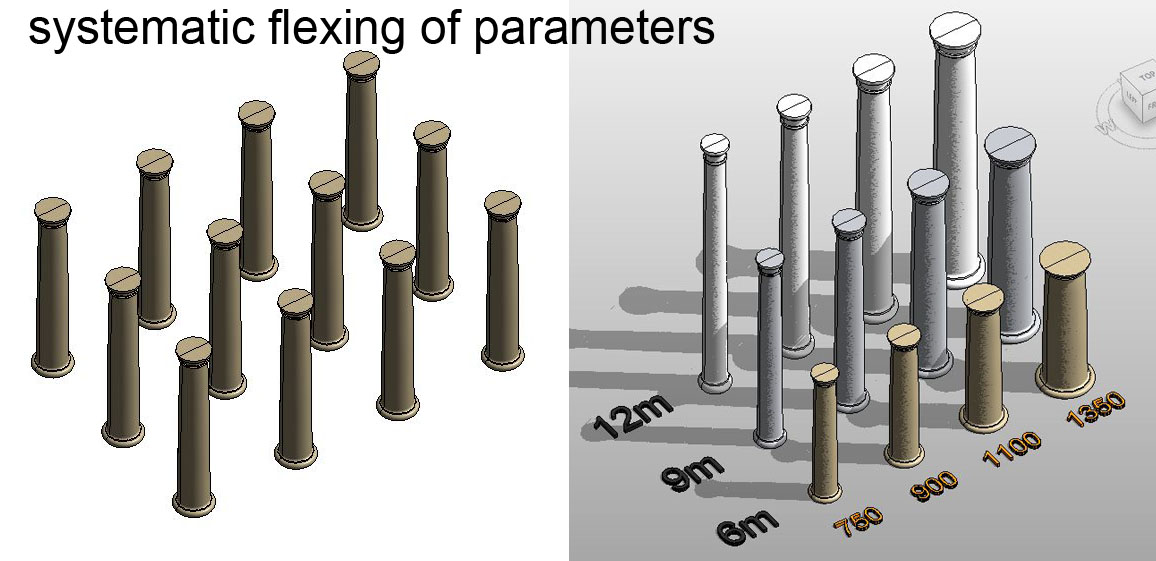
So the next step was to lay out a whole array of these things, make sure the parameters for Height & Width (actually the Width is more like a radius, it's the width of the rectangular rig, which is actually a bit more than the radius at the base of the column) then we can vary the size of this array in a systematic manner. I'm pretty chuffed with this result, BUT ... let's not get too carried away.

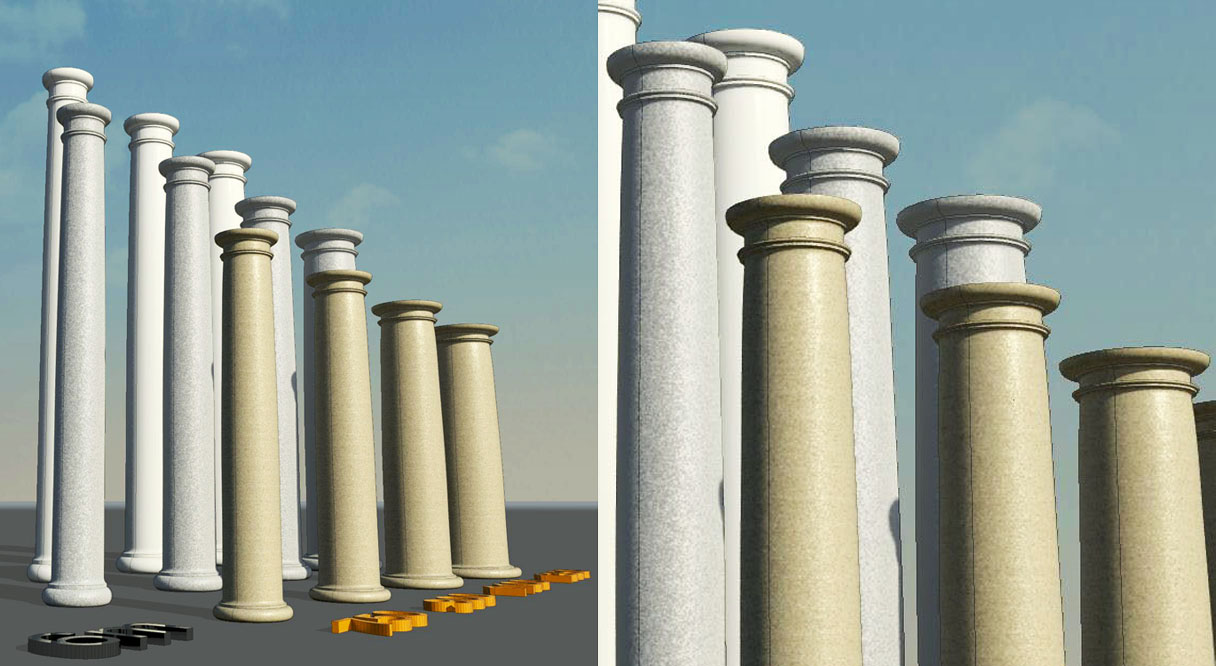
I decided to do a camera view. Now this is where I start moaning about why we can't navigate through Revit in perspective. Yeah, yeah, yeah ... But it is clear that errors of proportion are much more obvious in a camera shot. Now all the columns I would be happy to use in real life, (the ones that are not ridiculously thin or disgustingly fat) are pretty good, but at the extreme ends of the scale the mouldings look wrong. Seems to me that we should probably be making this column in 3 parts so that the width factor for base & capital can be controlled independently of the width factor for the shaft.

That will have to be for another day because it's 5 to 8 now and work beckons. I will aim to tidy up this post at lunch time and toss it out there before leaving tonight, because tomorrow is an islamic holiday & our weekend is friday/saturday so ... LONG WEEKEND COMING.

New family - Generic Model Adaptive. Make a rectangular rig in an elevation view. Or just download this starter file . . . Rectangular Rig

The rig is set up in front elevation, so bring in a suitable jpeg and scale it to an appropriate size. Mine happens to be six metres high and I set the width of the rig to 750, which seemed to be about right. The next part is a bit tedious, but I had it all done by breakfast time. Actually it's just 6.15 am as I type these words and I'm expecting the alarm to go off at any moment.
Set 3d snapping on and chain off. Now you can created lots and lots of horizontal "rungs". I ended up with around 25 or 26. With a bit of practice you can draw these so that they snap to horizontal (most of the time) but don't worry if you get that "slightly out of alignment" message. They don't actually have to be horizontal for the method to work, although it does give us an unexpected bonus later on as you will see. The alarm is getting annoying so I will have to finish this off later.

2 fried eggs, a shave & a mad dash down Emirates Highway. I'm in the office now and it's only 7.30 so let's continue. Once you have some rungs in place you can start hanging splines on them. Some of them can be drawn directly, the straight bits might be better created by selecting 2 points and doing a "spline through points". The hardest parts to do are the straight segments with a bit of a curve on the end. Splines are very interactive. Push down on one part of the curve and another part will shoot up. With a few extra points and a bit of practice you can get pretty close.

After I had done most of the capital I decided to test it out. Just selected the spline and did a "create form" The result is a surface and it looks pretty good to me, so on we go.
Actually I was past half way by this stage. ie Most of the complexity in a tuscan column resides in the capital. By the way you may notice that I did a "duplicate view" so that I had a front elevation without the jpeg. This makes it easier to select points & see what you are doing. (I'm still using 2013 by the way) To complete the profile for the revolve you need to draw reference lines on top of reference lines. This is always trick. I wish we had subcategories of reference lines so I could have 2 types with different colours. You can always use the sunglasses & do a temporary hide of the rig. Anyway next thing you know I have a Tuscan column. Looks pretty good, except for the seam. That's one drawback with the conceptual massing revolves, they always come in 2 halves. That's a real shame.

Took it into a project and the elevation view looks fine. None of the artefacts we got with the "scale by spline" in vanilla Revit. And because I took the time to get the ref lines horizontal I can get a dimension chain to pick them up. Just do a callout and up the scale to 1:10 and we have all the dimensions my mould maker might need.

So the next step was to lay out a whole array of these things, make sure the parameters for Height & Width (actually the Width is more like a radius, it's the width of the rectangular rig, which is actually a bit more than the radius at the base of the column) then we can vary the size of this array in a systematic manner. I'm pretty chuffed with this result, BUT ... let's not get too carried away.
I decided to do a camera view. Now this is where I start moaning about why we can't navigate through Revit in perspective. Yeah, yeah, yeah ... But it is clear that errors of proportion are much more obvious in a camera shot. Now all the columns I would be happy to use in real life, (the ones that are not ridiculously thin or disgustingly fat) are pretty good, but at the extreme ends of the scale the mouldings look wrong. Seems to me that we should probably be making this column in 3 parts so that the width factor for base & capital can be controlled independently of the width factor for the shaft.

That will have to be for another day because it's 5 to 8 now and work beckons. I will aim to tidy up this post at lunch time and toss it out there before leaving tonight, because tomorrow is an islamic holiday & our weekend is friday/saturday so ... LONG WEEKEND COMING.
This comment has been removed by a blog administrator.
ReplyDeleteSometimes, the most obvious solutions only emerge after stepping away or during moments of reflection—and it seems like your mind just had the perfect alignment for that! Plus, the connection between classical architecture and modern parametric tools like the SRR could be a great bridge between the two. I can recommend you a store that has everything and they have discount wholesale
ReplyDelete