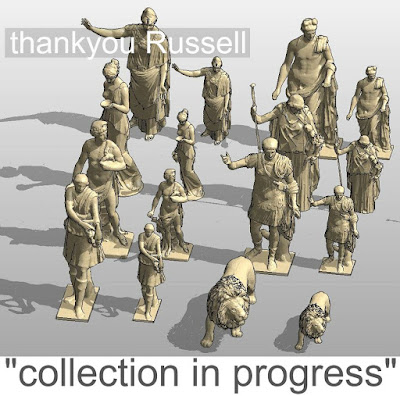
A couple of posts back I put caryatids as placeholders for the four statues that stood guard over Soane's triumphal arch on the south side of Lothbury Court. Soon afterwards I got a message from Russell Fuller Hill who did such a fantastic job of modelling the Consols Transfer Office, way back in the early days of Project Soane. He was the original source of these caryatids, and offered to come up with a few more examples.

Sure enough, a week or so later he sent me a link to half a dozen "Greek statues" gleaned from the web. They aren't close matches to the figures that Soane used, but at least we can have some variety. In any case, a placeholder is not meant to be a faithful representation. We just want to say, "here are four different statues in a classical style". So I have taken Russell's statues and a couple that I found myself, and turned them into a little collection... to be enlarged upon as time allows.
Russell's approach to mesh geometry is to give the "spiders web" a pale colour so that it fades into the background. It's a simple solution, but I'm not happy with the orthographic, hidden line views that result. I want to see a black outline and a little bit of detail, so that the statues a represented in the same general way as all the other geometry. This is achieved by processing the image with 3dsMAX. Now I'm a complete novice in Max, but I stumble my way through a hack that I picked up on the web by groping around the interface.

It involves exporting to DXF, which requires a maximum of roughly 30k faces in the model ... so you have to "optimise" (sometimes called decimate)
My first attempts to do this were abject failures. It was simply deleting faces, leaving gaps everywhere. Did I forget something? Is there something different about these meshes? Who knows? But I fixed it by fiddling with the options.

I'm using the "ProOptimiser" function (Modifiers/Mesh Editing/ProOptimiser) and the key variable seems to be the "Merge Vertices" tick-box. Check that and play around with the percentage figure until the faces/after number gets down to 30k. Then export to 2004DXF. For some reason that will remember the edge hiding that you do in the next step.

Delete everything, then re-import the DXF. Forgive me if I am being stupid here, but this is the process that works for me. I had problems hiding edges with a modifier in the stack. Kept reverting to the larger number of faces. So exporting and reimporting was a simple/crude way of getting around that. It works. You go to edge selection mode (a little wireframe triangle) Select everything. Scroll down and click on "invisible". The edges change from solid to dashed, or if you change from "Clay" mode (my favourite) to wireframe, everything disappears. You have hidden the edges

Export to 2004DXF again and you have a CAD mesh that imports into a Revit family, looking the way I like it to look. For some models that's all you need to do. For the statue of Hera (I'm pretty sure that's who she is, goddess of motherhood) The simplified mesh is OK-ish but a bit crude when you zoom in. So I included two versions in the family, with an instance visibility switch. So when you are generating renders in Enscape3d, you get the nice smooth look.

In my collection, I've made these as Site category (maybe I want to host some statues on Topography) but inside there are double-nested planting families, so the whole thing scales to whatever you type into the Height parameter. But I'll leave all that to another post.

Sure enough, a week or so later he sent me a link to half a dozen "Greek statues" gleaned from the web. They aren't close matches to the figures that Soane used, but at least we can have some variety. In any case, a placeholder is not meant to be a faithful representation. We just want to say, "here are four different statues in a classical style". So I have taken Russell's statues and a couple that I found myself, and turned them into a little collection... to be enlarged upon as time allows.

Russell's approach to mesh geometry is to give the "spiders web" a pale colour so that it fades into the background. It's a simple solution, but I'm not happy with the orthographic, hidden line views that result. I want to see a black outline and a little bit of detail, so that the statues a represented in the same general way as all the other geometry. This is achieved by processing the image with 3dsMAX. Now I'm a complete novice in Max, but I stumble my way through a hack that I picked up on the web by groping around the interface.

It involves exporting to DXF, which requires a maximum of roughly 30k faces in the model ... so you have to "optimise" (sometimes called decimate)
My first attempts to do this were abject failures. It was simply deleting faces, leaving gaps everywhere. Did I forget something? Is there something different about these meshes? Who knows? But I fixed it by fiddling with the options.

I'm using the "ProOptimiser" function (Modifiers/Mesh Editing/ProOptimiser) and the key variable seems to be the "Merge Vertices" tick-box. Check that and play around with the percentage figure until the faces/after number gets down to 30k. Then export to 2004DXF. For some reason that will remember the edge hiding that you do in the next step.

Delete everything, then re-import the DXF. Forgive me if I am being stupid here, but this is the process that works for me. I had problems hiding edges with a modifier in the stack. Kept reverting to the larger number of faces. So exporting and reimporting was a simple/crude way of getting around that. It works. You go to edge selection mode (a little wireframe triangle) Select everything. Scroll down and click on "invisible". The edges change from solid to dashed, or if you change from "Clay" mode (my favourite) to wireframe, everything disappears. You have hidden the edges

Export to 2004DXF again and you have a CAD mesh that imports into a Revit family, looking the way I like it to look. For some models that's all you need to do. For the statue of Hera (I'm pretty sure that's who she is, goddess of motherhood) The simplified mesh is OK-ish but a bit crude when you zoom in. So I included two versions in the family, with an instance visibility switch. So when you are generating renders in Enscape3d, you get the nice smooth look.

In my collection, I've made these as Site category (maybe I want to host some statues on Topography) but inside there are double-nested planting families, so the whole thing scales to whatever you type into the Height parameter. But I'll leave all that to another post.
This comment has been removed by a blog administrator.
ReplyDeleteThis comment has been removed by a blog administrator.
ReplyDelete