I came across the term "reference plane hell" in a forum a couple of years back and it's always stuck in my mind. Some guy who was probably used to the simplicity & freedom of Sketchup was struggling to do things the Revit way. Most of us have been through this frustration and many regular Revit users never quite figure out how to unleash the power of reference planes.
I decided to make a deck chair family the other day, and very quickly realised this is a classic reference plane situation. I started off by making a "typical member" which is a simple rectangular extrusion.


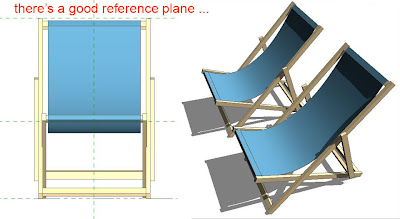
Go ahead and place the seat on it's own reference plane. The 2 struts and the rail are placed on the third work plane and have different breadth & depth parameters. This gives the illusion that the rail is rotated through 90 degrees. If you need to adjust the angles of the frames, just go into a side view and rotate the reference planes.
Once you understand the way reference planes work it's easy to control the geometry. But if you just place objects without linking them to planes, trying to rotate them in 3 dimensional space is very frustrating.


Four of these get put together to make one of the frames. So nest the "typical member" into a new family, set up your reference planes, place 4 members and constrain them. By associating the length of members with the Width & Length of the host family your frame becomes parametric and ready for nesting into the Deck Chair family itself.

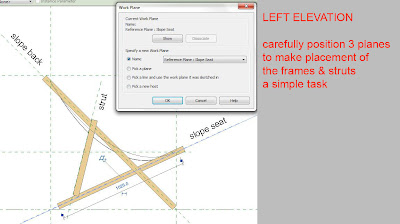
This third family is where the reference planes really start working for a living. Go to a side elevation and draw angled planes. Give them names (important step)

Load a frame and place it on the work plane for the sloping back. User created workplanes only show up if you have given them names. This frame family is now locked into a relationship with that reference plane and will remain parallel to it. You can go into the front elevation and align it centre-to-centre. Lock it in place if you like. Nudge it up and down, it will simply slide along the plane. If you want it to move away from the plane you will need to specify an offset in the properties dialogue.

Once you understand the way reference planes work it's easy to control the geometry. But if you just place objects without linking them to planes, trying to rotate them in 3 dimensional space is very frustrating.

The rest is quite easy: an extrusion for the canvas, some material parameters and you have a perfectly acceptable deck chair to populate the pool decks of your resort projects.
Just to recap, the deck chair has two nested families, a strut and a frame. Each of these nested families has two types, with slightly differen sizes.

Struts are also nested inside the frame family, but I renamed the family as "member" and there is just one type, named "typical".

If you fight against Reference Planes, then life can be hell, but if you learn to work with them, and plan your families systematically, Reference Planes will actually give you greater freedom and control than the simplistic, push-pull methods of a programme like Sketchup. No offence to Sketchup, it's a great little app, but Revit can take you higher ... if you have the patience to learn its heavenly secrets.
I don't think its just sketchup users that find Revits reference planes hard to work with. Anyone coming from MCAD software like Solidworks, Solidedge, Inventor, or Catia, all workplane based software, will find Revits reference planes much more limiting.
ReplyDeleteI'm sure you are right. Perhaps it's partly because Industrial Design products present somewhat different challenges. My aim here was not to defend Revit's approach to workplanes, but to offer intermediate level users some insight into their positive features.
ReplyDelete