This is a continuation of my previous work on Mushrabiya Screens. It was prompted by a query from an experienced Revit user in our office who was looking to do a scaleable pattern with variable "member sizes".

First of all you need to choose your pattern and draw it, probably in a drafting view. Sometimes it helps to trace over a jpeg image. You need to think in terms of construction lines, which usually means extending the pattern through to the edge of a bounding rectangle. The goal is to identify the points where the construction lines meet the boundary.

You need the spacing of these points, expressed as fractions of the boundary side. These fractions will become "normalised curve parameters" in a curtain panel family.

Open up a "curtain panel by pattern" template in family editor and place points along the boundary. They should be hosted on the reference lines. Select each point and give it the desired "normalised curve parameter". Takes a while, depending on the complexity of the pattern. Now connect these points in pairs to recreate the construction grid.

Convert this grid into reference lines, and add more points. Select these new points, one by one and "host by intersection". You can now duplicate the default plan view and rename it. I named mine "no ref lines". Under visibility graphics, turn reference lines off in this view so you just see the points. Now you can creat the original pattern using model lines. Choose pairs of points and join using "spline by points". The customised plan view really helps you to see these new lines clearly without the confusion of the construction grid.

In my example I have 4 paths, each consisting of a chain of 8 lines. I host a point somewhere on each chain, make it's work plane "visible always", set this as the current work plane, and place a mass profile. Select path and profile: create form. Repeat for the other 3 and you have a curtain panel.

New family. Draw a rectangle in an elevation view. Add parameters for Length and Height. Change the lines to ref lines, select the loop and create form. You get 2 options (surface or solid) choose the surface. Select the surface and divide. Load the curtain panel and use it to populate the surface. You can create parameters to control the number of cells in U & V directions. In my case I used the same instance parameter for both directions.

Load this family into a project and place several instances. Vary the pattern scale with ease.
Next I added an angle parameter, again the same for both U & V. This rotates the pattern within the surface.

My next idea was to use "divide by intersect". I did this in family editor to create a surface divided into very irregular quadrilaterals. The panels adapts to these shapes without a murmur.

Looks a little crazy but maybe that's what you want.

Back to the previous divided-surface family and I added a label for the embedded curtain panel. Now you can load several different panels and swop them in and out.

I also have parameters to control the mass profile used in the sweeps. Now from inside family editor you can select individual panels and adjust how "heavy" the members are.

I dredged up some of the previous patterns I had made. I was a bit lazy at the time and used circles for the sweeps, so I went back and replaced these with nested profile families and gave myself the option of switching between circular and rectangular sections.

Now all the preparatory work is beginning to pay off and I have a highly parametric mushrabiya family. So I packaged it up as a little christmas present for all my faithful readers.

Hope you enjoy it.
SCREEN FAMILY HERE
I am off on holiday now so may not be posting until the new year.


First of all you need to choose your pattern and draw it, probably in a drafting view. Sometimes it helps to trace over a jpeg image. You need to think in terms of construction lines, which usually means extending the pattern through to the edge of a bounding rectangle. The goal is to identify the points where the construction lines meet the boundary.

You need the spacing of these points, expressed as fractions of the boundary side. These fractions will become "normalised curve parameters" in a curtain panel family.

Open up a "curtain panel by pattern" template in family editor and place points along the boundary. They should be hosted on the reference lines. Select each point and give it the desired "normalised curve parameter". Takes a while, depending on the complexity of the pattern. Now connect these points in pairs to recreate the construction grid.
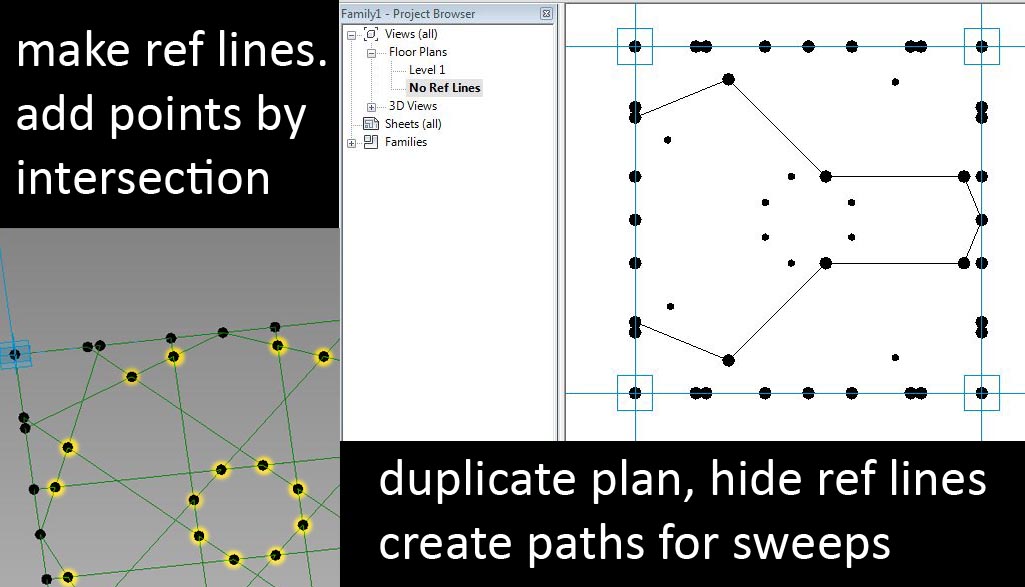
Convert this grid into reference lines, and add more points. Select these new points, one by one and "host by intersection". You can now duplicate the default plan view and rename it. I named mine "no ref lines". Under visibility graphics, turn reference lines off in this view so you just see the points. Now you can creat the original pattern using model lines. Choose pairs of points and join using "spline by points". The customised plan view really helps you to see these new lines clearly without the confusion of the construction grid.

In my example I have 4 paths, each consisting of a chain of 8 lines. I host a point somewhere on each chain, make it's work plane "visible always", set this as the current work plane, and place a mass profile. Select path and profile: create form. Repeat for the other 3 and you have a curtain panel.

New family. Draw a rectangle in an elevation view. Add parameters for Length and Height. Change the lines to ref lines, select the loop and create form. You get 2 options (surface or solid) choose the surface. Select the surface and divide. Load the curtain panel and use it to populate the surface. You can create parameters to control the number of cells in U & V directions. In my case I used the same instance parameter for both directions.

Load this family into a project and place several instances. Vary the pattern scale with ease.
Next I added an angle parameter, again the same for both U & V. This rotates the pattern within the surface.

My next idea was to use "divide by intersect". I did this in family editor to create a surface divided into very irregular quadrilaterals. The panels adapts to these shapes without a murmur.

Looks a little crazy but maybe that's what you want.

Back to the previous divided-surface family and I added a label for the embedded curtain panel. Now you can load several different panels and swop them in and out.

I also have parameters to control the mass profile used in the sweeps. Now from inside family editor you can select individual panels and adjust how "heavy" the members are.

I dredged up some of the previous patterns I had made. I was a bit lazy at the time and used circles for the sweeps, so I went back and replaced these with nested profile families and gave myself the option of switching between circular and rectangular sections.

Now all the preparatory work is beginning to pay off and I have a highly parametric mushrabiya family. So I packaged it up as a little christmas present for all my faithful readers.

Hope you enjoy it.
SCREEN FAMILY HERE
I am off on holiday now so may not be posting until the new year.

Andy tnx for nice present, wish u merry xmas and happy new year...and cant wait for many of your amazing posts in 2013...cheers
ReplyDeleteNice designing.
ReplyDeleteThis should be done step by step as shown in the post..That's so nice of you that you shared each and every single step of how to make it,it will be helpful to the one who want or need..I will try this..
ReplyDeleteThis comment has been removed by a blog administrator.
ReplyDelete