Yesterday I installed Revit 2024.
Looking forward to investigating some of the new features, but early this
morning I was intrigued by a ceiling pattern posted by Philip Gaches.
I was struggling to grasp why it is different in the X
and Y directions. Rule no one: "if you want to understand something, draw
it yourself." So I set about familiarising myself with the new/tweaked
icons by setting up this pattern over a larger area in a drafting view.
It's abstracted into heavy lines for the mouldings,
ignoring the enrichments for the moment. Another day I might create two ceiling
based components to implement this in 3d, then go on to tackle the leaves, etc.
Fascinating pattern. Deceptively simple. Thanks Philip.

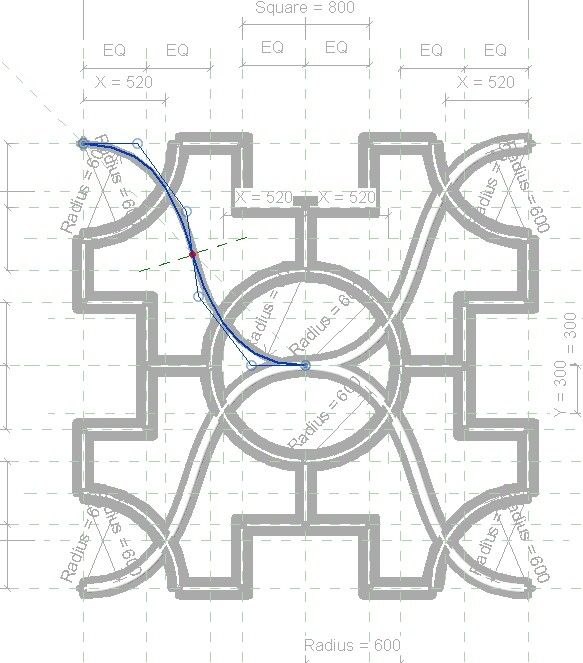
Further development of the ceiling
pattern I posted a few days ago. Parametric version. You can vary the module
and the circle radius.
The "expected" radius is one quarter module.
It looks a bit crazy if you deviate too far from that so I am showing
"slightly larger" and "slightly smaller" than expected, in
two different module sizes.
This is done in Revit using model lines, and the
"secret sauce" is a spline (for the S shaped link) In case you don't
know, a spline curve will maintain it's shape when the two ends are stretched.
So by constraining those ends to reference planes I get a predictably gentle S
curve when the family is flexed.
Credit to Philip Gaches for
the original design. Dmitriy Karpovich
for encouraging me to experiment with a parametric version and David Wood for
making the "expected case" more explicit.
Looks more complicated than it really is in Family
Editor 🙄

"That pattern" again.
As I started to replace the model lines with solid
sweeps I realised that there is another way to look at this. You can take a
spline from each corner to the centre, giving a smoother overlapping effect.
In the process, the "eyes" lose their strict symmetry, which I quite like, to be honest. More like a human eye in fact.
The next step is supposed to be bears' heads and thistles. Interesting challenge to abstract those symbols into native Revit forms.
The afternoon beckons, day one of the EID break.

Final post for today. Ran out of
steam for the thistles. Maybe tomorrow.
Camera view this time, with a bit of post processing to
soften the image a bit, give it the human touch.
I have no idea where I can use this ceiling. Maybe I
need to attempt a "typical timber-frame house" of the Elizabethan
period. But not right now.
I should have a quick go at some thistles then back to
the shophouses.

Lots of shortcomings in this Revit
model, but for now it's time to move on.
I never intended to go beyond a quick drafting sketch
of the basic pattern, but it's turned into an enjoyable and multi-faceted
exploration.
First there was the parametric aspect: making the
module and circle radius independently resiseable. Then two rounds of fine
tuning the underlying geometry. Conversion of model lines to sweeps turned out
to be fairly straightforward. Using simple extrusions and revolves to represent
bear and thistles likewise but fun. Need to add a bit of trickery so some of
the leaves appear to be draped over the mouldings. Another time.
Giving the model a certain natural irregularity is a
difficult challenge in Revit, I made a small start in this iteration. Also
added simple post-processing of the exported image to fake it.
Back to the shophouses I think.

No comments:
Post a Comment
I've been getting a lot of spam so had to tighten up comments permissions. Sorry for any inconvenience. I do like to hear from real people